React渲染原理
React 的理念
设计理念:UI = f(state)
React 把 UI 看成「由状态推导出来的纯函数」:每次状态变化时,重新计算出一份新的 UI 描述(虚拟 DOM)→ React 帮你高效算出差异 → 最后用最小代价更新到真实界面。也就是:UI = f(state)。
这个理念可以拆成三点心智模型:
- 响应式编程:只要状态(state)变了,React 会负责「重新算 UI + 更新到界面」,不需要手动操作 DOM。
- 组件化:页面拆成一个个组件,每个组件内部有自己的状态和逻辑,对外只暴露 props,方便复用和维护。
- 单向数据流:数据从父组件单向流向子组件;子组件要影响父组件,只能通过回调把「意图」往上抛,这让数据流向更可预测、方便调试。
性能视角下的两个瓶颈
现代大型 Web 应用通常会遇到两类瓶颈:
- CPU 瓶颈:JS 计算量大、渲染树复杂,导致一帧内算不完 → 掉帧、卡顿。
- IO 瓶颈:网络或本地 IO(如 IndexedDB)耗时长,界面长时间没有响应(按钮点了没反应、列表迟迟不出来)。
React 16 之后的 Fiber 架构,主要就是为了解决 CPU 瓶颈:把渲染工作拆成小片段,可以在多帧之间打断和恢复;而 Suspense / 并发特性等则帮助缓解 IO 瓶颈 带来的体验问题(例如加载骨架屏、优先渲染重要内容)。
CPU 瓶颈:一帧只有 ~16ms
先看浏览器一帧的节奏,才能理解为什么要「任务切片」。
大多数设备屏幕刷新率是 60Hz,也就是每秒刷新 60 次,对应大约:
1 秒 = 1000ms → 1000 / 60 ≈ 16.6ms / 帧
只要我们能在每一帧的预算时间内完成「JS 执行 + 样式计算 + 布局 + 绘制 + 合成」,动画就会看起来比较流畅(60FPS 左右)。但浏览器本身也要花时间做样式计算、布局、绘制等工作,留给 JS 的通常不到 16ms,很多文章经验值会抓一个保守数:大约 8~10ms。
如果某一帧里 JS 执行时间太长(比如一次性 setState 导致渲染大量组件、复杂计算),就会占满甚至超出这一帧的预算,浏览器赶不上当前这次刷新,只能等下一次 → 用户看到的就是掉帧 / 卡顿。
浏览器一帧内大致做了什么
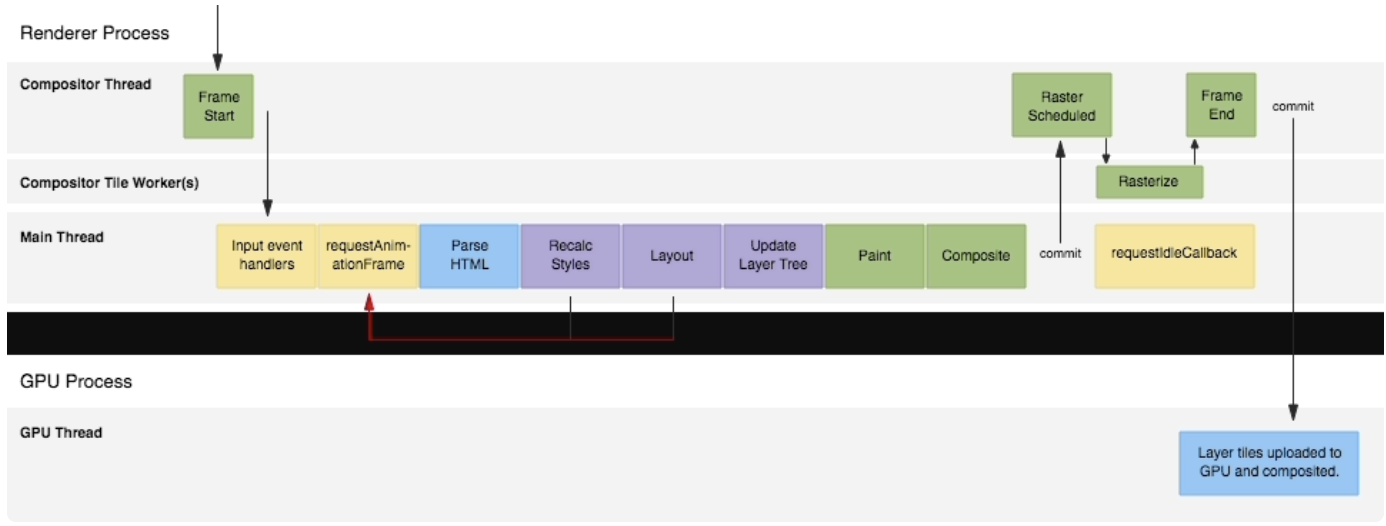
在不掉帧的情况下(60Hz),浏览器大致会在每 ~16.6ms 内按照这样的顺序跑一轮(不同浏览器细节略有差异):
- 处理本轮宏任务:click、keydown、scroll 等事件监听函数或定时器回调。
- 处理本轮宏任务附带的所有微任务:
Promise.then()的回调 - 执行
requestAnimationFrame回调:适合做动画逻辑,此时离布局/绘制最近。 - 样式计算 + 布局(Style / Layout):根据最新 DOM/CSS 计算每个元素的样式和几何信息。
- 绘制 + 合成(Paint / Composite):把各图层栅格化并在 GPU 中合成,输出到屏幕。
- 如果本帧还有空闲时间,才会执行
requestIdleCallback中注册的「闲时任务」。
关于 requestIdleCallback 相关,见requestIdleCallback
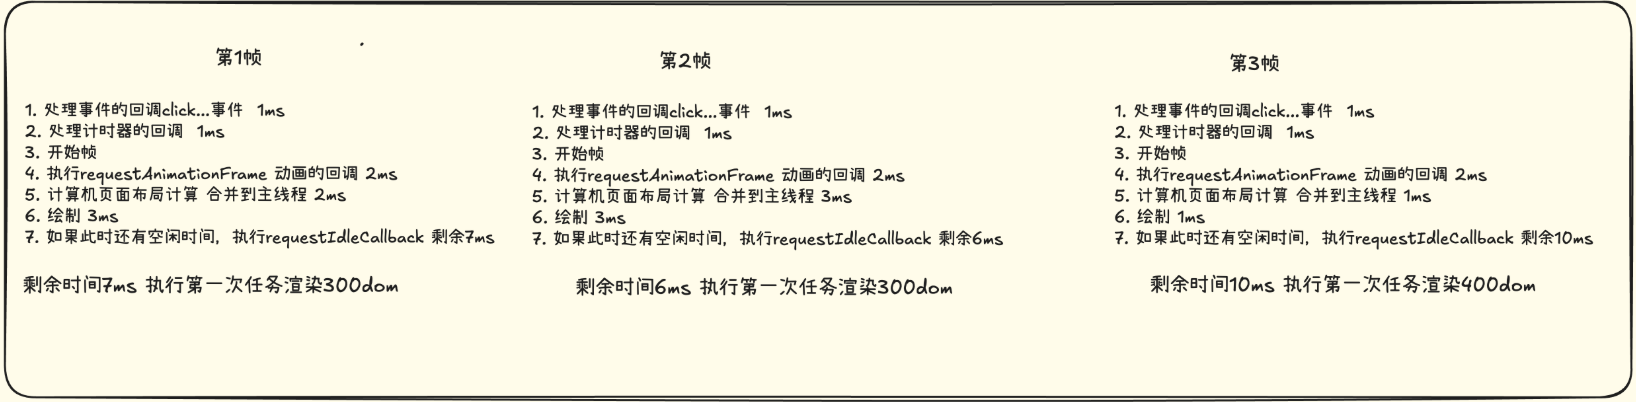
任务分片示例
假设要更新 1000 条 DOM,如果一次性全做完,很容易在某一帧里 JS 执行时间过长导致卡顿。更好的做法是:
- 把 1000 条拆成多次小更新,例如 300 + 300 + 400;
- 每一段更新逻辑放到
requestIdleCallback或基于时间切片的调度器里执行; - 这样每一小段都尽量控制在几毫秒之内,避免长时间占用主线程。
后面 React Fiber 的「可中断渲染」「优先级调度」「lane 模型」其实就是在做一件类似的事:把一次很重的渲染拆成很多小任务,分多帧、按优先级慢慢做完,让页面在复杂场景下依然尽量保持 60FPS 左右的体验。
React16 起的整体架构
从 React 16(Fiber)开始,可以把 React 的整体架构抽象成三层(这个划分在 React 18/19 依然成立):
- Scheduler(调度器):负责调度更新任务的优先级和执行时机。同步更新、用户输入、transition、低优先任务等,都是通过 lane/priority 交给 Scheduler 安排的。Scheduler本质上实现的是在每一帧中只占用一部分的时间来执行任务,并能在下一帧重新拉起任务
- Reconciler(协调器):负责基于 Fiber 架构,找出哪些组件/节点发生了变化。它会在内存里构建/更新
workInProgressFiber 树,执行组件(含 hooks)、做 Diff,并在 Fiber 上标记好需要执行的副作用(插入/更新/删除、effect 等)。 - Renderer(渲染器):负责把 Reconciler 算出来的变更真正渲染到目标环境。不同平台有不同渲染器,比如浏览器里的
react-dom、原生端的react-native、服务端渲染的react-dom/server等。
JSX、ReactElement、FiberNode、DomElement
先把这四个名词放在同一条链路里看清楚:
JSX(语法) → ReactElement(虚拟节点) → FiberNode(运行时节点) → DomElement(真实节点)
JSX
本质上是语法糖,例如:
1 | <App> |
ReactElement
JSX 编译后会变成
React.createElement/jsx调用,返回的就是 ReactElement 对象,用来描述 UI,这个 ReactElement对象也就是我们说的虚拟DOM:
1 | React.createElement( |
它只是「树状配置对象」,记录 type / key / props,本身不带状态和 DOM 引用。
FiberNode(Fiber 节点)
Reconciler 在渲染/更新时,会根据最新的 ReactElement 树和CurrentFiber树(上一次的Fiber树)创建或复用对应的 Fiber 节点:
- 一个元素位置(
{ type, key, props })≈ 一个 FiberNode; - FiberNode 上挂着:
memoizedProps、memoizedState、hooks 链表、flags/subtreeFlags、stateNode(真实实例)、alternate(双缓存另一侧)等; - Fiber 树是 React 持久存在的运行时结构,跨多次更新复用。
DomElement(真实 DOM 节点)
在 commit 阶段,Renderer(如
react-dom)会根据 Fiber 树上的信息,创建或复用真实 DOM
- 对
HostComponentFiber(如'div')创建HTMLDivElement,赋给fiber.stateNode; - 对
HostTextFiber 创建文本节点; - 对函数组件 Fiber 则没有对应 DOM,
stateNode为null。
总结
我们编写的是 JSX,编译成 ReactElement;
React 根据 ReactElement 构建/更新 FiberNode 树;
最后由 Renderer 把带 DOM 信息的 FiberNode 映射成真实的 DomElement。
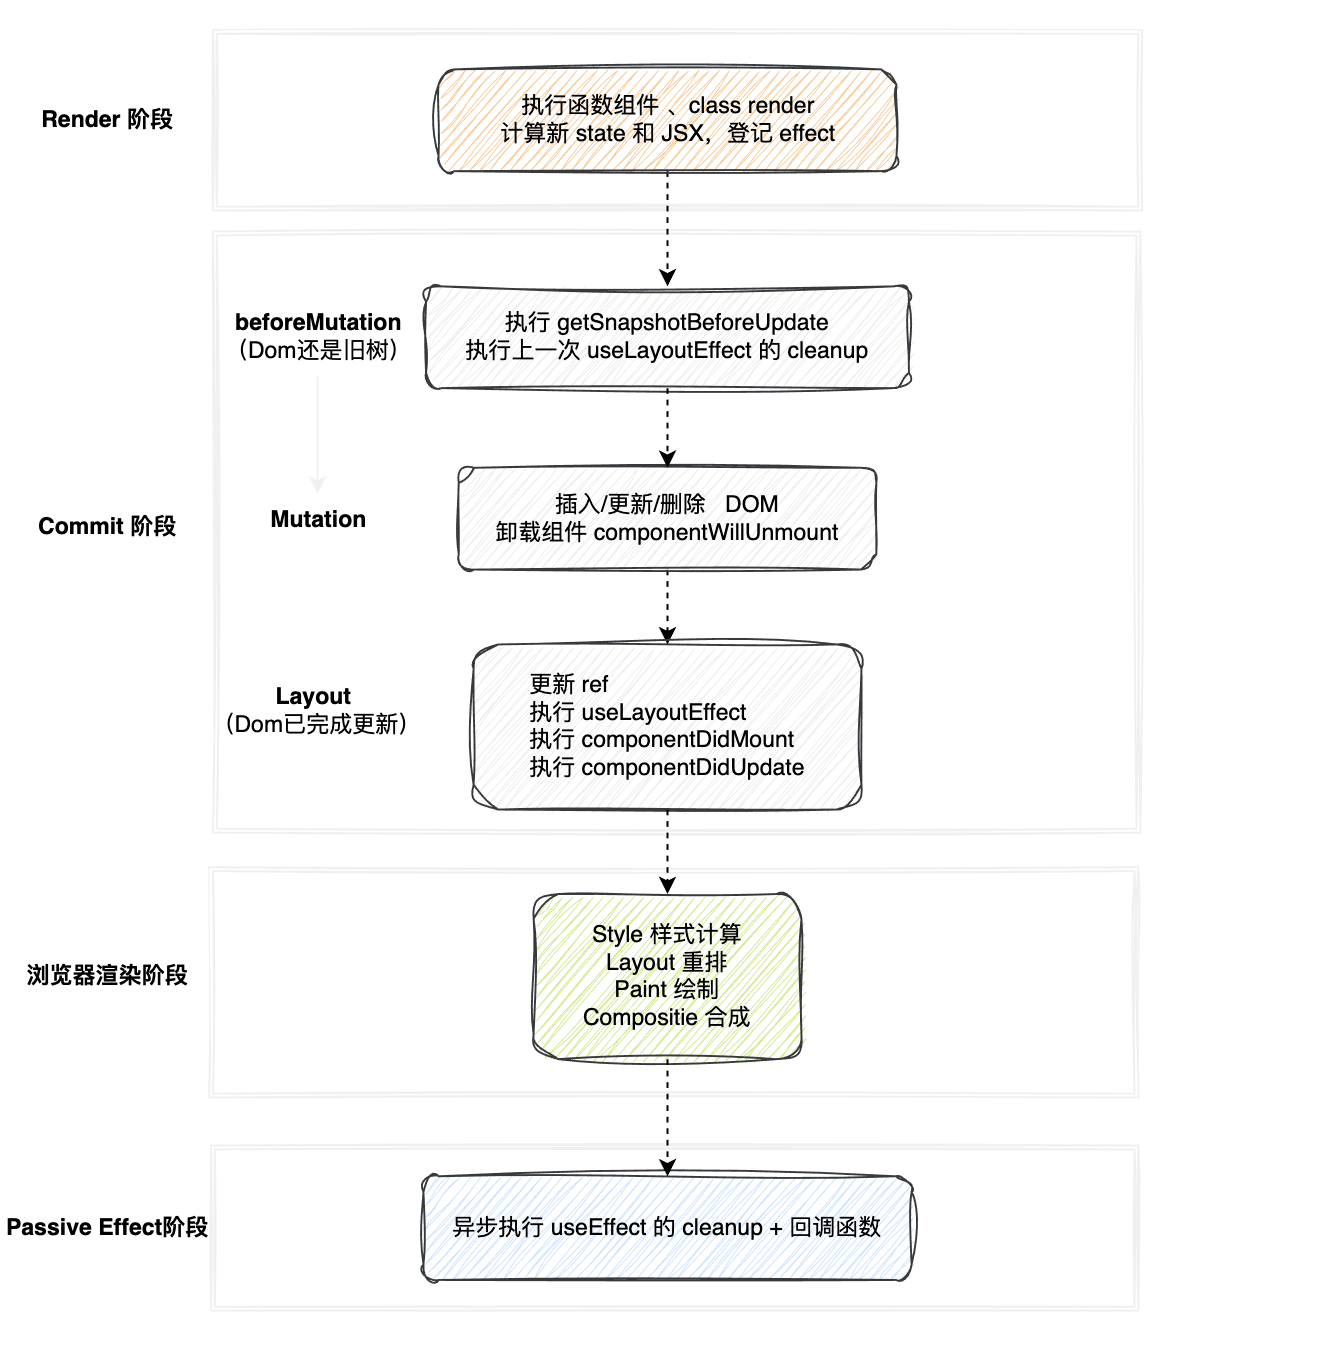
React 渲染整体概览
状态更新 ->
Scheduler调度 ->render阶段 ->commit阶段 -> 浏览器渲染 ->Passive Effects
常见的生命周期函数都是在哪些渲染阶段被调用
从一次 useState 的 setState 开始后发生了什么
以函数组件里的
useState为例,串一下「从调用setState到 state 真正更新」的完整过程:
1 | const [count, setCount] = useState(0); |
1. 调用 setState后,update、lane工作流程
1.1)setCount后,创建update对象
setCount后React会创建一个update对象,挂在当前 hook 的queue上(环形链表)
1 | const update = { |
1.2)把本次更新的lane冒泡到 Fiber 树和根上,并交给调度器Scheduler:
lane冒泡 -> FiberRootNode维护
pendingLanes
1 | scheduleUpdateOnFiber(fiber, lane); |
- 给当前 Fiber 及其祖先 Fiber 的
lanes字段 OR 上这个lane; - 给 FiberRootNode 的
pendingLanesOR 上这个lane; - 交给
Scheduler决定「什么时候按这个 lane 开始一次 render」。
到这里为止,还没有进入 beginWork / renderWithHooks,也还没算出新的 state,只是「把有更新这件事记在 updateQueue + lanes 里,并安排了一次渲染任务」。
2. Scheduler 调度与 renderLanes 计算
上面 1.1 / 1.2 只是把 update 和 lane“记账”,真正“什么时候、以哪些 lane 开始一次 render”要经过 Scheduler + React 自己的一轮调度,流程可以类比成“先排一个任务,再在任务里挑 lane”:
2.1)Scheduler 安排「这棵树需要一次渲染任务」
scheduleUpdateOnFiber(fiber, lane) 内部会定位到对应的 FiberRootNode,然后调用:
1 | ensureRootIsScheduled(root); |
scheduleCallback是scheduler包暴露的 API;- 它会根据
priorityLevel(由 lane / 过期时间推导)把这个 root 的“渲染任务”塞进 Scheduler 的优先级队列里,稍后通过MessageChannel/setTimeout等方式异步触发。
此时 Scheduler 只知道:“有一个 performConcurrentWorkOnRoot(root) 需要按某个优先级执行”,完全不知道 lane 是什么。
2.2)在 performConcurrentWorkOnRoot 里计算本次的 renderLanes
当 Scheduler 觉得“该干这活了”,会调用我们传进去的回调:
1 | function performConcurrentWorkOnRoot(root) { |
getNextLanes 的职责可以概括为三点:
- 从
pendingLanes中挑出“当前这档最高优先级的 lane(或一组 lane)”; - 与正在进行的
wipLanes比较(如果有),决定是否打断当前渲染、是否合并新来的更高优 lane; - 返回一组 lanes(一个 bitmask),作为这次渲染的
renderLanes。
2.3)带着 renderLanes 进入 render,并由 Scheduler 决定“这一帧能干多少”
后续的 renderRootConcurrent / workLoopConcurrent / beginWork / completeWork 都会携带这次的 renderLanes:
- 每个 Fiber 根据自己的
lanes/childLanes与renderLanes的交集,判断:- 本节点是否在这次需要重算(有交集);
- 子树里是否还有活(
childLanes与renderLanes有交集); - 两者都没有则可以直接 bail out 复用旧子树。
在这整个 render 循环里,React 会反复询问 Scheduler 提供的 shouldYieldToHost() / timeRemaining():
- 如果当前帧时间不够、渲染还没结束,就中断当前
workLoopConcurrent,保留nextUnitOfWork/wipRoot等指针,等待 Scheduler 下一次再调performConcurrentWorkOnRoot(root),从上次中断处继续; - 如果这次渲染顺利完成,则产生一棵完整的
finishedWork(workInProgress根),交给后面的 Commit 阶段。
小结:
scheduleUpdateOnFiber+scheduleCallback:告诉 Scheduler「这个 root 需要一次渲染任务」,并确定任务的“执行优先级”;performConcurrentWorkOnRoot+getNextLanes:在每次任务真正执行前,从pendingLanes里选出这轮要处理的renderLanes;workLoopConcurrent+shouldYieldToHost:在这一轮里,带着renderLanes构建workInProgress树,并根据当前帧剩余时间决定是否分片 / 中断。**
3. Render Phase(可中断)
Schedule调度后,进入到Render阶段,这里主要是Reconciler 的工作,完全在内存中进行
3.1)向下:beginWork
- 对每个 Fiber 先判断能否 bail out(复用子树):
- 若
props/type未变、且该 Fiber 子树在本轮renderLanes中没有需要处理的update(由lanes/updateLanes决定),则直接复用current子树,不再往下执行组件/做 Diff。 - 若不能复用:根据
workInProgress.tag分别处理: - 函数组件(
FunctionComponent):
调用renderWithHooks(current, workInProgress, Component, props, renderLanes):- 设置当前「正在工作的 Fiber」和 Hooks dispatcher;
- 执行函数组件本身:
Component(props); - 在执行过程中依次处理:
useState/useReducer:基于current的 hooks 链表 +updateQueue计算新state,写入workInProgress.memoizedState(hooks 链表);useMemo/useCallback:根据依赖判断是否重新计算;useEffect/useLayoutEffect:记录依赖、生成 effect 对象,并在当前 Fiber 上打上Passive/Layout等 flag;
- 函数组件的返回值(JSX / ReactElement / 数组等)记为
nextChildren。
- 类组件 / HostRoot / HostComponent 等:这里略。
- 有了
nextChildren之后,调用reconcileChildren(current, workInProgress, nextChildren, renderLanes): - mount 时走
mountChildFibers:根据nextChildren创建子 Fiber 链(child → sibling); - update 时走
reconcileChildFibers:对比current.child和nextChildren,按key + type尽可能复用旧 Fiber,否则创建/删除,并为子 Fiber 打上Placement/Update/Deletion/Passive/Layout等 Effect 标记。 - 返回
workInProgress.child作为下一个beginWork的目标,继续向下深度优先遍历。
3.2)向上:completeWork
- 深度优先到底后开始回溯,对每个 Fiber 做收尾:
- 有 DOM 的 Fiber(
HostComponent/HostText):- 创建或复用真实 DOM 节点,挂到
fiber.stateNode; - 把子 DOM 节点挂到当前 DOM 下(仅在内存中组织好结构);
- 汇总当前节点及子树的
flags/subtreeFlags信息,为 commit 阶段准备完整的副作用视图。
- 创建或复用真实 DOM 节点,挂到
- 无 DOM 的 Fiber(函数组件 / Fragment 等):
- 不创建 DOM,只把子树收集到的副作用向上合并,让根节点可以拿到一条「只包含有副作用 Fiber 的视图」。
- 最终在根 Fiber(
finishedWork)上,得到: - 一棵完整的
workInProgressFiber 树(包含本轮算好的 props/state/hooks/DOM 指针); - 一份按
flags/subtreeFlags或 effectList 表示的「需要在 commit 阶段执行的所有副作用」集合。
Render 阶段特点:
- 只在内存里「算 UI」:执行函数组件 + Hooks,计算新的 state/props,做 Diff,打副作用标记;不直接动 DOM。
- 可中断、可恢复:通过把每个 Fiber 的
beginWork + completeWork当作一个小任务,并在循环中检查shouldYieldToHost,实现任务分片和高优任务插队(Fiber + Scheduler 的价值)。
4. Commit Phase(不可中断)
render阶段结束后,进入到commit阶段,该阶段主要是根据render阶段生成的effectList去更新DOM,同时调用对应的生命周期函数、副作用函数
commit 阶段对应的是Renderer的工作,分成三个子阶段
4.1)beforeMutation(变更前,DOM 还是旧树)
- 执行「改 DOM 之前」需要跑的逻辑:
getSnapshotBeforeUpdate(类组件);- 上一次
useLayoutEffect的 cleanup(同步)。
- 此时 DOM 仍然是旧树,方便你在这里读取「变更前」的滚动位置、尺寸等。
4.2)mutation(变更 DOM)
- 根据 Fiber 上的
flags/ effectList,真正对 DOM 进行修改:Placement:插入新节点;Update:更新已有节点的属性、文本、子节点等;Deletion:从 DOM 树里移除要删除的节点,并递归卸载子树(执行componentWillUnmount、清理ref、调用旧的 effect cleanup 等)。
- 这一阶段结束时,真实 DOM 已经更新为新树,并触发浏览器后续的 Layout 计算。
4.3)layout(布局相关副作用)
- 切换双缓存树:
root.current = finishedWork,本轮workInProgressFiber 树变成新的current。 - 执行依赖最新 DOM 的同步副作用:
useLayoutEffect回调(同步、在浏览器 Paint 之前执行);- 类组件的
componentDidMount/componentDidUpdate; - 更新
ref.current(绑定新 ref,旧 ref 在 mutation 阶段已被清理)。
- 在这一阶段,React 也会把需要执行的
useEffect(Passive Effects)收集好,排入被动副作用队列,等待浏览器绘制后异步执行。
⚠️ layout 阶段结束时,DOM 已经是新树,但浏览器 Paint 可能还没真正把新内容画到屏幕上。
5. 浏览器渲染阶段(Renderer 之后)
React Commit 完成后,浏览器会走自己的渲染流水线(不同引擎命名略有差异,大致如下):
- Style(样式计算):重新计算受影响节点的样式。
- Layout(重排):基于最新 DOM / 样式计算元素的几何信息。
- Paint(绘制):把各层内容栅格化成位图。
- Composite(合成):在 GPU 中把图层合成,最终输出到屏幕。
6. Passive Effects Phase(被动副作用)
在浏览器完成本帧绘制之后,React 会进入「被动副作用」阶段
6.1)执行 useEffect 的 cleanup + 回调(异步)
- 清理上一次渲染遗留的副作用;
- 执行本次渲染中注册的
useEffect回调。
此时用户已经看到更新后的界面,useEffect 更适合做不影响首屏同步布局的逻辑(如订阅、日志、请求等)。
结合事件循环,Scheduler的任务调度、render、commit阶段是位于1frame的哪个阶段
Fiber架构
Fiber的意义
在React15及以前,Reconciler采用递归的方式创建虚拟DOM,递归过程是不能中断的。如果组件树的层级很深,递归会占用线程很多时间,造成卡顿。
为了解决这个问题,React16将递归的无法中断的更新重构为异步的可中断更新,由于曾经用于递归的虚拟DOM数据结构已经无法满足需要。于是,全新的Fiber架构应运而生。
Fiber的结构
本质上就是个双链表,每个子节点、兄弟节点都有指回父节点的指针

Fiber Node存储的信息
每个Fiber Node主要保存了以下信息:
- 该组件的类型(函数组件/类组件/原生组件…)
- 当前/上一次的
props、state; - 副作用标记(插入 / 更新 / 删除 / effect 等);
- 对应真实宿主实例的
stateNode(浏览器环境下就是 DOM 节点); alternate指向另一棵树上的“同一个位置”的 Fiber(双缓存:current ↔ workInProgress)。
代码如下:
1 | function FiberNode( |
FiberRootNode存储的信息
ReactDOM.createRoot时会创建一个代表整个Fiber应用的对象,它的结构为
1 | // 简化版类型定义:FiberRootNode / FiberRoot |
主要负责:
- 和渲染器绑定(containerInfo 是 DOM / Native / 其他宿主)。
- 管整个应用的调度状态(pending 更新、优先级、调度回调等)。
- 双缓存树的切换
Fiber的工作过程
双缓存
react内部有两颗树维护着两个状态:一个是current fiber tree,一个是work in progress fiber tree
- current fiber tree:表示当前正在渲染的fiber树
- work in progress fiber tree:表示更新过程中新生成的fiber树,也就是渲染的下一次UI状态
举个例子:
当我们用 canvas 绘制动画时,每一帧绘制前都会调用 ctx.clearRect 清除上一帧的画面,如果当前帧画面计算量比较大,导致清除上一帧画面到绘制当前帧画面之间有较长间隙,就会出现白屏。
为了解决这个问题,我们可以在内存中绘制当前帧动画,绘制完毕后直接用当前帧替换上一帧画面,由于省去了两帧替换间的计算时间,不会出现从白屏到出现画面的闪烁情况。
React应用的根节点(也就是FiberRootNode)通过使current指针在不同Fiber树的rootFiber间切换来完成current Fiber树指向的切换。
Render阶段
流程概览
先整棵树从上到下做 beginWork(把整棵 workInProgress 树建好,对有变化的Fiber打上effectTag标记),再从下到上做 completeWork(把 DOM 和 effectList 收好)最后 commit阶段 按 effectList 去改真实 DOM。
“递”阶段
首先从rootFiber开始向下深度优先遍历。为遍历到的每个Fiber节点调用beginWork 方法。
该方法会根据传入的Fiber节点创建子Fiber节点,并将这两个Fiber节点连接起来。
当遍历到叶子节点(即没有子组件的组件)时就会进入“归”阶段。
“归”阶段
在“归”阶段会调用completeWork处理Fiber节点。
当某个Fiber节点执行完completeWork,如果其存在兄弟Fiber节点(即fiber.sibling !== null),会进入其兄弟Fiber的“递”阶段。
如果不存在兄弟Fiber,会进入父级Fiber的“归”阶段。
“递”和“归”阶段会交错执行直到“归”到rootFiber。至此,render阶段的工作就结束了。
实际例子
1 | function App() { |
Fiber结构为:
render阶段会依次执行:
1 | 1. rootFiber beginWork |
beginWork
beginWork 的工作可以概括为:
- 判断能否复用当前Fiber对应的子树,如若可以,直接复用。
- 如若不能复用,找出相对 current fiber 的变化(详细见:Diff算法),为有变化/存在useEffect、useLayoutEffect副作用的节点打上 EffectTag(Placement/Update/Deletion 等)。
beginWork入参
1 | function beginWork( |
整体流程图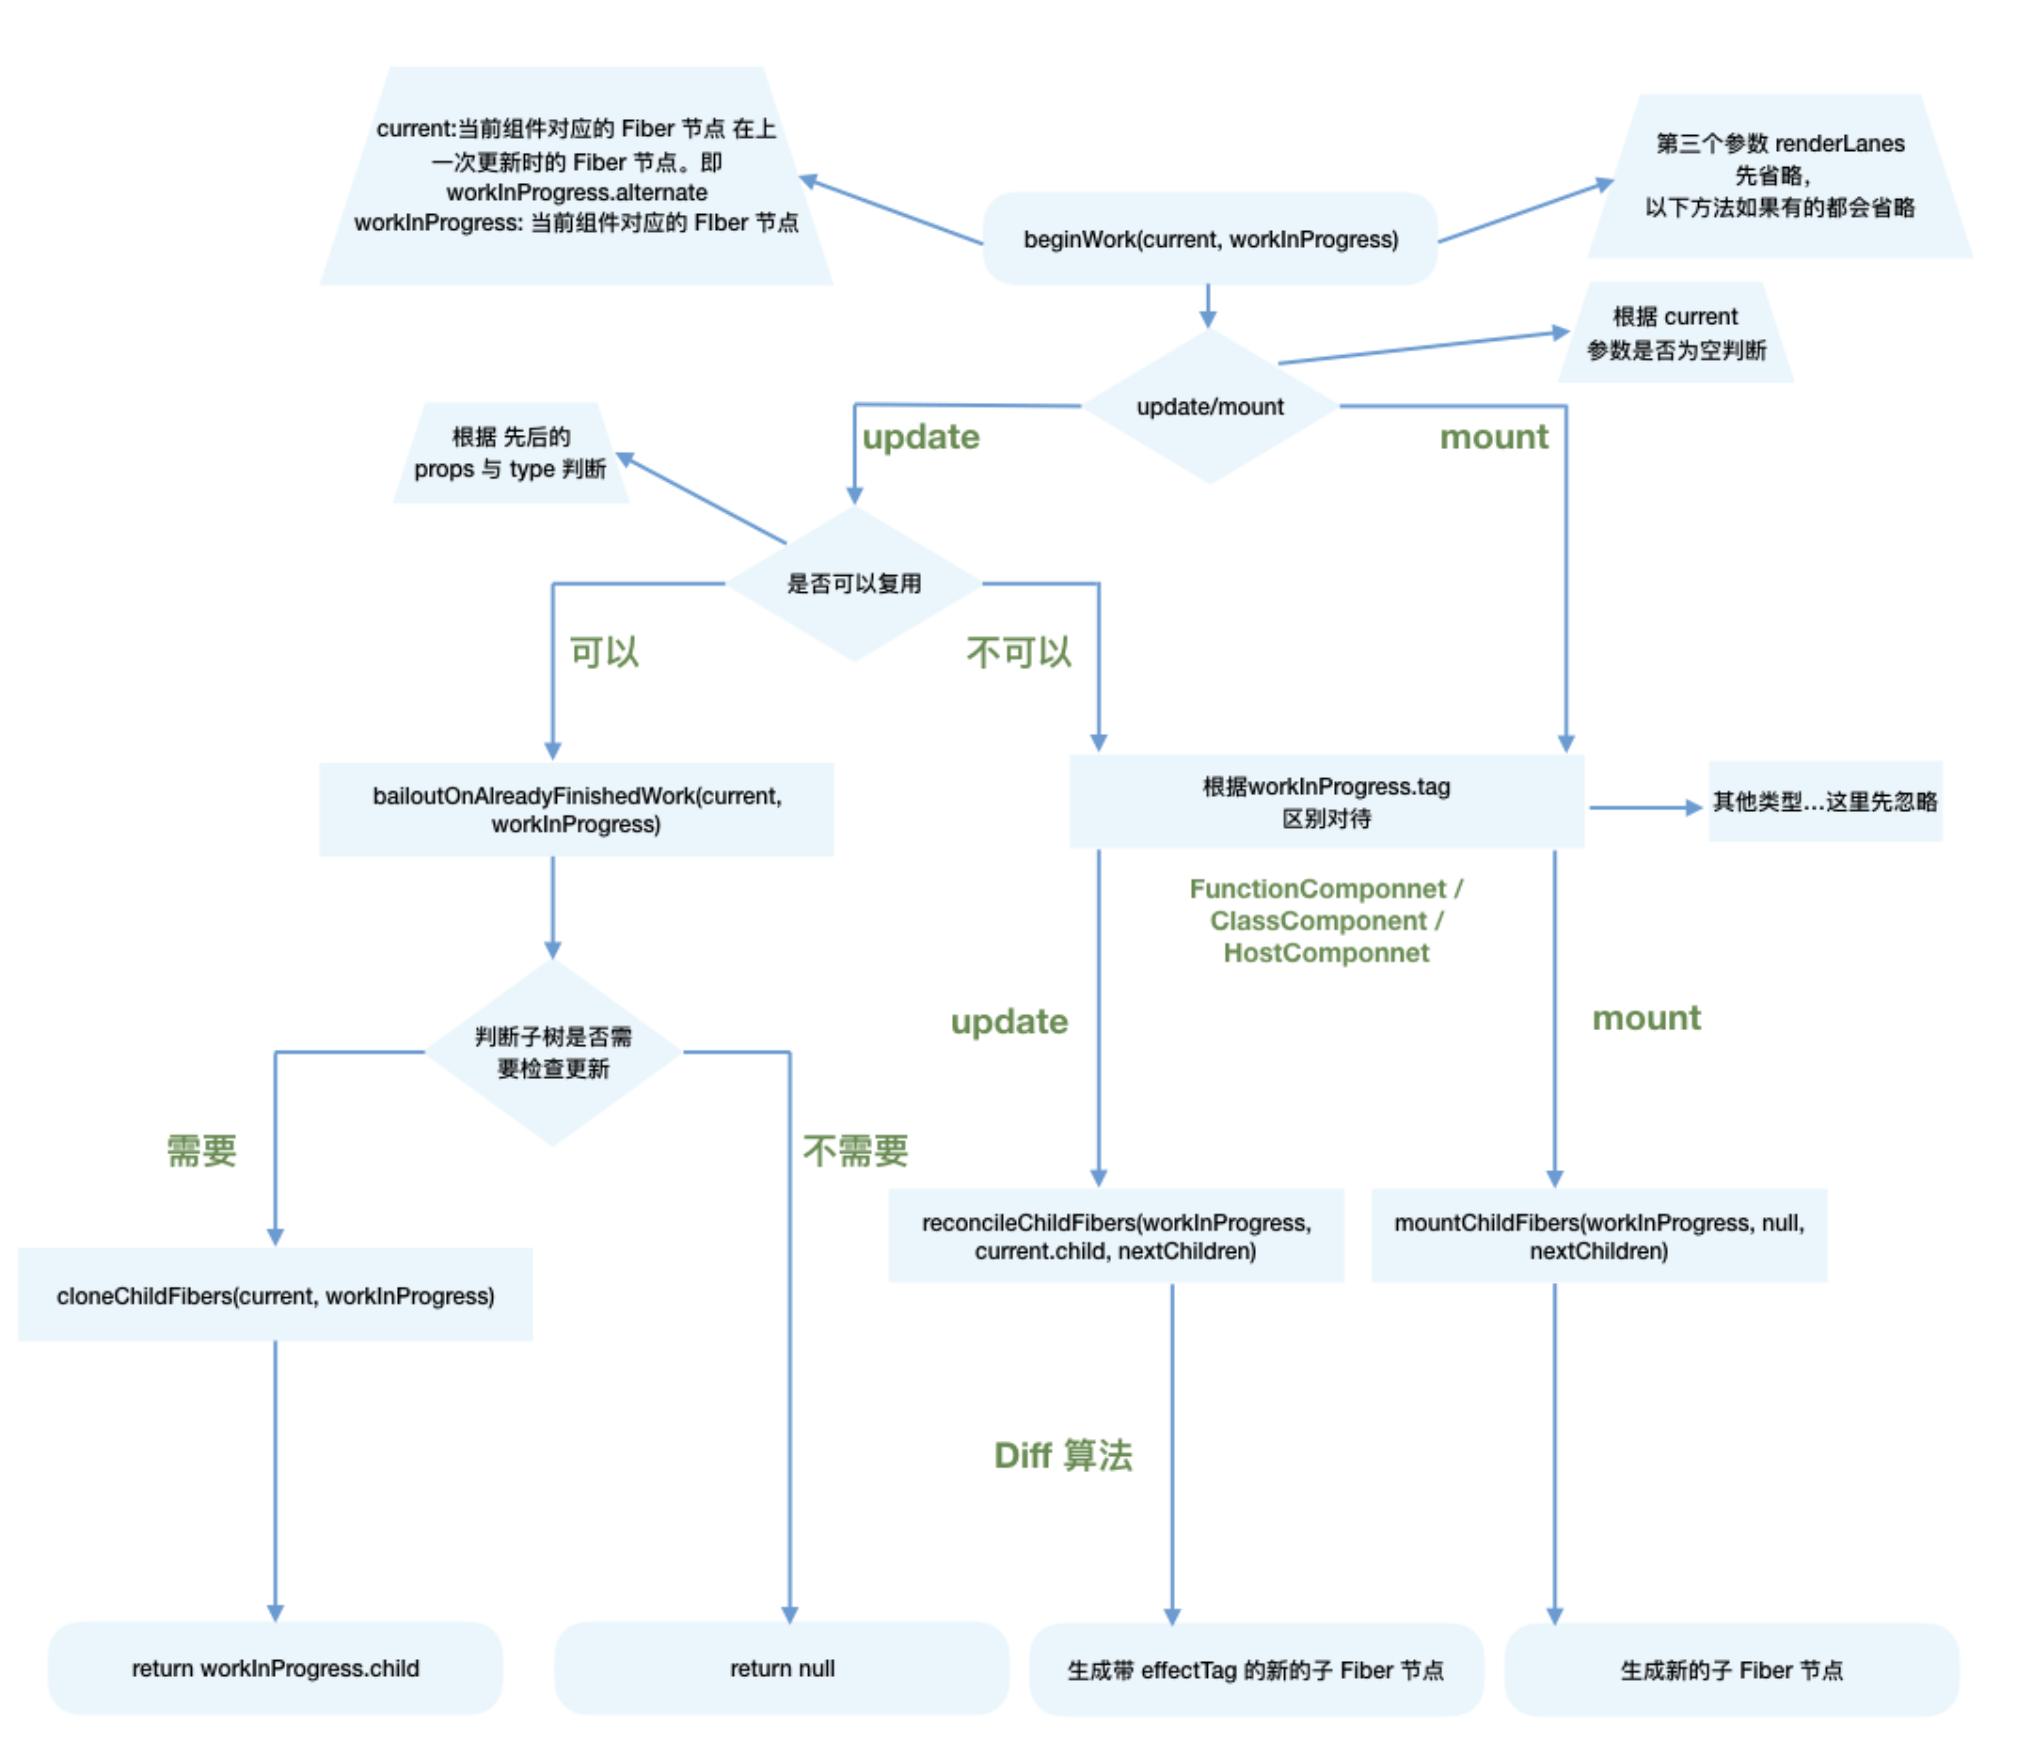
1 | function beginWork( |
mount时
没有可复用的Fiber,会进入第二部分,新建子Fiber。mount阶段不存在current fiber,所以会直接进入这个部分
1 | // mount时:根据tag不同,创建不同的Fiber节点 |
对于常见的组件类型,如(FunctionComponent/ClassComponent/HostComponent),最终会进入reconcileChildren方法。
update时
先判断Fiber以及对应子树能否复用,若不能复用,走mount时的逻辑
1 | // update阶段 |
满足如下情况时didReceiveUpdate === false(即可以直接复用前一次更新的子Fiber,不需要新建子Fiber),也就是 bail out(复用子树)
即props与fiber.type不变:
oldProps === newProps && workInProgress.type === current.type!includesSomeLane(renderLanes, updateLanes):即当前节点对应的Fiber子树没有本轮要处理的更新
renderLanes这一轮 render 要处理哪些 lane 的更新
由Scheduler来决定,Scheduler挑出一批 lane 作为这次 render 要处理的范围,这批就是 renderLanes)
updateLanes
这个 Fiber 对应的子树上,有哪些 lane 的更新还没被处理。
来源为这个Fiber自己的更新(父节点setState后会有一个对应的lane),子节点的更新(会向上合并到父节点)
reconcileChildren
不能复用Fiber子树时,逻辑会走到这里。这是Reconciler模块的核心部分:
- mount的组件,会创建新的子Fiber节点
- update的组件,会将当前组件与该组件在上次更新时对应的Fiber节点比较(也就是俗称的Diff算法,详细见:Diff算法),将比较的结果生成新Fiber节点
1 | export function reconcileChildren( |
这两个方法mountChildFibers与reconcileChildFibers的逻辑基本一致。
唯一的区别是:reconcileChildFibers会为生成的Fiber节点带上effectTag属性,而mountChildFibers不会。
effectTag
render阶段的工作是在内存中进行,当工作结束后会通知Renderer需要执行的DOM操作。要执行DOM操作的具体类型就保存在fiber.effectTag中。
比如:
1 | // DOM需要插入到页面中 |
completeWork
completeWork 实际上的工作可以概括为:
有 DOM 的节点(
HostComponent/HostText等)- 创建或复用真实 DOM 节点(
document.createElement/ 文本节点),挂到fiber.stateNode。 - 把已经准备好的子节点 DOM 挂到当前 DOM 下(
appendChild等)。 - 基于新旧
props准备属性、样式、事件等信息(具体更新在 commit 阶段按 flags 执行)。 - 把当前节点及子树的副作用信息合并到当前 Fiber 上,方便后续在根上收集完整的 effect 列表。
- 创建或复用真实 DOM 节点(
没有 DOM 的节点(
FunctionComponent、ClassComponent、Fragment等)- 不创建 DOM,只负责把子节点收集到的副作用向上合并(effect 收集),让根节点能沿着一条链找到所有要执行的 DOM 操作。
最终结果
- 整棵
workInProgress树从叶子到根,每个节点该有的 DOM 和 effect 都准备好; - 根 Fiber 上可以一次性拿到需要在 commit 阶段执行的所有副作用,commit 只需顺着这条链走一遍即可,也就是effectList。
- 整棵
completeWork 入参
1 | function completeWork( |
整体流程图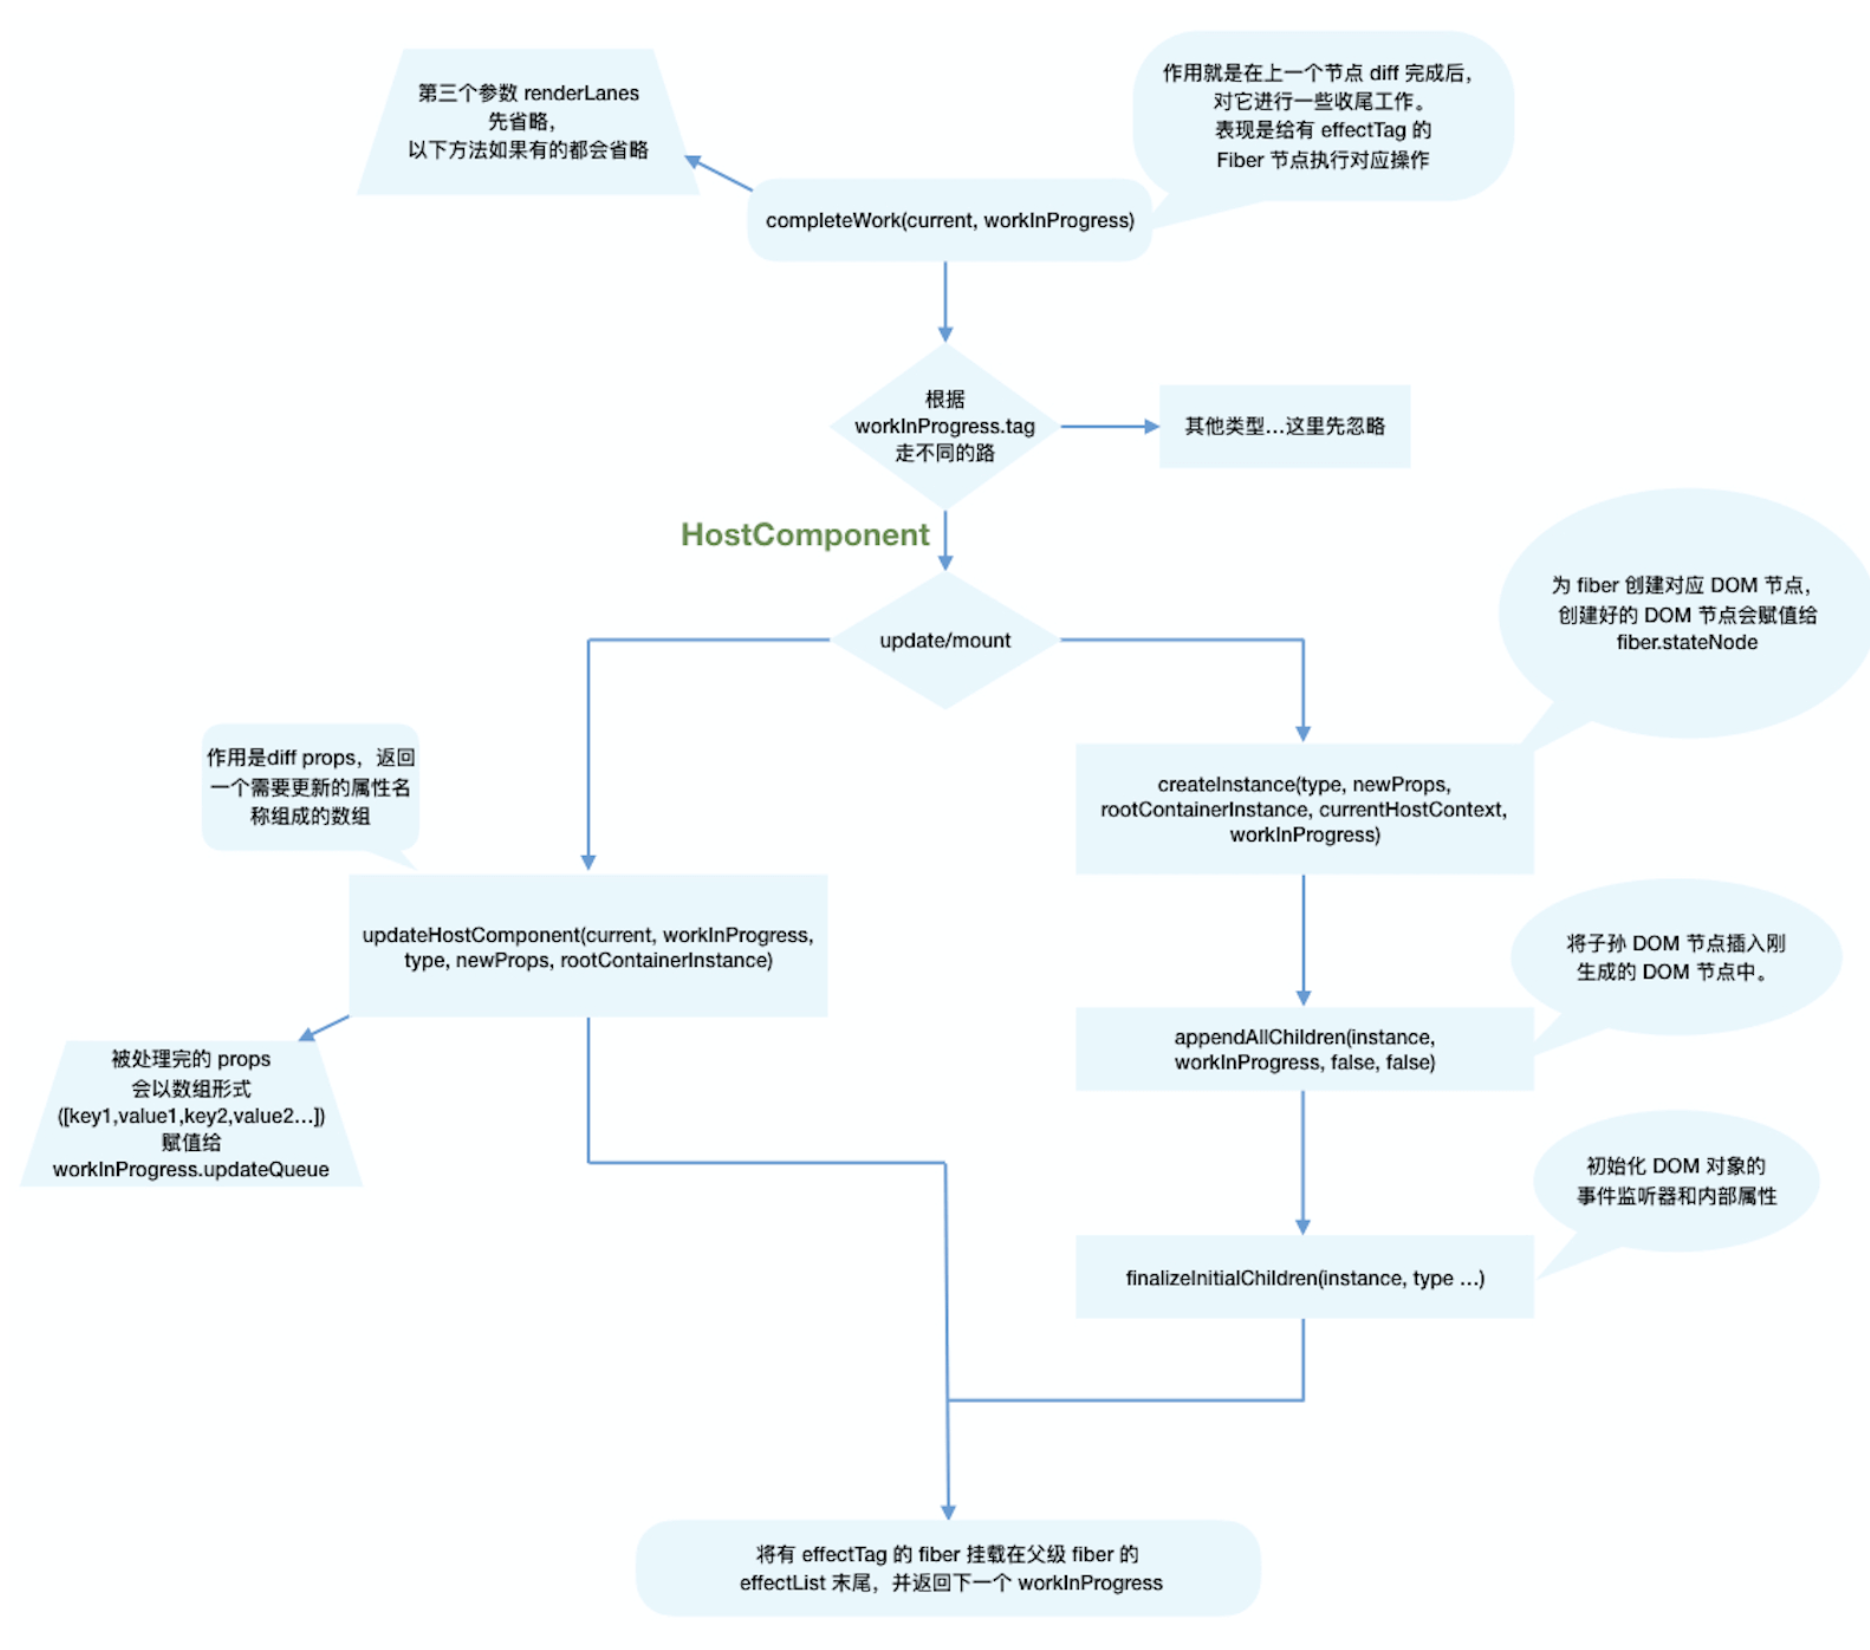
mount时
mount时的主要逻辑包括三个:
- 为Fiber节点生成对应的DOM节点
- 将子孙DOM节点插入刚生成的DOM节点中
- 与update逻辑中的updateHostComponent类似的处理props的过程
1 | // mount的情况 |
update时
当update时,Fiber节点已经存在对应DOM节点,所以不需要生成DOM节点。需要做的主要是处理props,比如:
- onClick、onChange等回调函数的注册
- 处理style prop
- 处理DANGEROUSLY_SET_INNER_HTML prop
- 处理children prop
effectList
至此render阶段的绝大部分工作就完成了。
还有一个问题:作为DOM操作的依据,commit阶段需要找到所有有effectTag的Fiber节点并依次执行effectTag对应操作。难道需要在commit阶段再遍历一次Fiber树寻找effectTag !== null的Fiber节点么?
这显然是很低效的。
为了解决这个问题,在completeWork的上层函数completeUnitOfWork中,每个执行完completeWork且存在effectTag的Fiber节点会被保存在一条被称为effectList的单向链表中。
类似appendAllChildren,在“归”阶段,所有有effectTag的Fiber节点都会被追加在effectList中,最终形成一条以rootFiber.firstEffect为起点的单向链表。
1 | nextEffect nextEffect |
- rootFiber.firstEffect:这次更新中第一个需要执行副作用的 Fiber;
- rootFiber.lastEffect:最后一个带副作用的 Fiber;
- 中间靠每个 Fiber 的 nextEffect 串成一条单链表。
这样,在commit阶段只需要遍历effectList就能执行所有effect了。
Commit阶段
流程概览
Commit 阶段在 render 阶段结束后同步执行、不可中断,把 workInProgress 树上收集好的副作用effectList应用到真实 DOM/视图,并切换双缓存的Fiber树。
commitRoot方法是commit阶段工作的起点。FiberRootNode会作为传参。
1 | commitRoot(root); |
在rootFiber.firstEffect上保存了一条需要执行副作用的Fiber节点的单向链表effectList,这些Fiber节点的updateQueue中保存了变化的props。
这些副作用对应的DOM操作在commit阶段执行。
除此之外,一些生命周期钩子(比如componentDidXXX)、hook(比如useEffect)需要在commit阶段执行。
commit阶段的主要工作(即Renderer的工作流程)分为三部分:
before mutation 阶段(执行DOM操作前)
mutation 阶段(执行DOM操作)
layout 阶段(执行DOM操作后)
在before mutation阶段之前和layout阶段之后还有一些额外工作,涉及到比如useEffect的触发、优先级相关的重置、ref的绑定/解绑。
before mutation 之前
layout 之后
1 | const rootDidHavePassiveEffects = rootDoesHavePassiveEffects; |
主要包括三点内容:
useEffect相关的处理。
性能追踪相关。
源码里有很多和interaction相关的变量。他们都和追踪React渲染时间、性能相关,在Profiler API和DevTools中使用。在commit阶段会触发一些生命周期钩子(如 componentDidXXX)和hook(如useLayoutEffect、useEffect)。
beforeMutation阶段
流程概览
这个阶段的代码很短,整个过程就是遍历
effectList并调用commitBeforeMutationEffects函数处理,该阶段是DOM变更前,此时DOM还是旧树
1 | // 保存之前的优先级,以同步优先级执行,执行完毕后恢复之前优先级 |
函数commitBeforeMutationEffects主要做了三件事
- 处理DOM节点渲染/删除后的 autoFocus、blur 逻辑
- 调用getSnapshotBeforeUpdate生命周期钩子
- 异步调度useEffect
调用getSnapshotBeforeUpdate
从Reactv16开始,UNSAFEcomponentWillMount、UNSAFE_componentWillReceiveProps、UNSAFE_componentWillUpdate钩子前增加了UNSAFE前缀。
究其原因,是因为Stack Reconciler重构为Fiber Reconciler后,render阶段的任务可能中断/重新开始,对应的组件在render阶段的生命周期钩子(即componentWillXXX)可能触发多次。
这种行为和Reactv15不一致,所以标记为UNSAFE_。
为此,React提供了替代的生命周期钩子getSnapshotBeforeUpdate。
可以看见,getSnapshotBeforeUpdate是在commit阶段内的before mutation阶段调用的,由于commit阶段是同步的,所以不会遇到多次调用的问题,且可以读取到旧的 DOM 状态。
mutation阶段
流程概览
类似before mutation阶段,mutation阶段也是遍历effectList,执行函数。这里执行的是commitMutationEffects。
1 | nextEffect = firstEffect; |
commitMutationEffects
commitMutationEffects会遍历effectList,对每个Fiber节点执行如下三个操作:
- 根据ContentReset effectTag重置文字节点
- 更新ref
- 根据effectTag分别处理,其中effectTag包括(Placement | Update | Deletion | Hydrating),Hydrating作为服务端渲染相关
1 | function commitMutationEffects(root: FiberRoot, renderPriorityLevel) { |
layout阶段
该阶段之所以称为layout,因为该阶段的代码都是在DOM修改完成(mutation阶段完成)后执行的。
注意:由于 JS 的同步执行阻塞了主线程,所以此时 JS 已经可以获取到新的DOM,但是浏览器对新的DOM并没有完成渲染。
该阶段触发的生命周期钩子和hook可以直接访问到已经改变后的DOM,即该阶段是可以参与DOM layout的阶段。
流程概览
与前两个阶段类似,layout阶段也是遍历effectList,执行函数。具体执行的函数是commitLayoutEffects。
1 | root.current = finishedWork; |
current Fiber树切换
root.current = finishedWork;
(在mutation阶段结束后,layout阶段开始前。)
:双缓存树的切换发生在本次 DOM 变更完成之后、layout 生命周期和 useLayoutEffect 之前。
我们知道componentWillUnmount会在mutation阶段执行。此时current Fiber树还指向前一次更新的Fiber树,在生命周期钩子内获取的DOM还是更新前的。
componentDidMount和componentDidUpdate会在layout阶段执行。此时current Fiber树已经指向更新后的Fiber树,在生命周期钩子内获取的DOM就是更新后的。
commitLayoutEffects
代码如下,主要是做了两件事:
- commitLayoutEffectOnFiber(调用生命周期钩子和hook相关操作,触发状态更新的this.setState如果赋值了第二个参数回调函数,也会在此时调用)
- commitAttachRef(赋值 ref)
1 | function commitLayoutEffects(root: FiberRoot, committedLanes: Lanes) { |
commitLayoutEffectOnFiber
commitLayoutEffectOnFiber方法会根据fiber.tag对不同类型的节点分别处理。
- 对于ClassComponent,他会通过
current === null?区分是mount还是update阶段,
调用componentDidMount或componentDidUpdate。 - 对于FunctionComponent及相关类型,他会调用
useLayoutEffect hook的回调函数,异步调度useEffect的销毁与回调函数
1 | switch (finishedWork.tag) { |
Diff算法
Diff算法概览
一个DOM节点在某一时刻最多会有4个节点和他相关。
current Fiber。如果该DOM节点已在页面中,current Fiber代表该DOM节点对应的Fiber节点。workInProgress Fiber。如果该DOM节点将在本次更新中渲染到页面中,workInProgress Fiber代表该DOM节点对应的Fiber节点。DOM节点本身。JSX对象。即ClassComponent的render方法的返回结果,或FunctionComponent的调用结果。JSX对象中包含描述DOM节点的信息。
Diff算法的本质是对比1和4,生成2。
Diff的瓶颈
由于Diff操作本身也会带来性能损耗,即使在最前沿的算法中,将前后两棵树完全比对的算法的复杂程度为 O(n 3 ),其中n是树中元素的数量。
为了降低算法复杂度,React的diff会预设三个限制:
只对同级元素进行Diff。如果一个DOM节点在前后两次更新中跨越了层级,那么React不会尝试复用他。
两个不同类型的元素会产生出不同的树。如果元素由div变为p,React会销毁div及其子孙节点,并新建p及其子孙节点。
开发者可以通过 key prop来暗示哪些子元素在不同的渲染下能保持稳定。考虑如下例子:
1
2
3
4
5
6
7
8
9
10
11// 更新前
<div>
<p key="ka">ka</p>
<h3 key="song">song</h3>
</div>
// 更新后
<div>
<h3 key="song">song</h3>
<p key="ka">ka</p>
</div>如果没有key,React会认为div的第一个子节点由p变为h3,第二个子节点由h3变为p。这符合限制2的设定,会销毁并新建。
但是当我们用key指明了节点前后对应关系后,React知道key === “ka”的p在更新后还存在,所以DOM节点可以复用,只是需要交换下顺序。
React key 的作用:虚拟 DOM 的标识,用于 Diff 过程中复用 DOM、减少不必要的销毁和创建。
Diff是如何实现的
从Diff的入口函数reconcileChildFibers出发,该函数会根据newChild(即JSX对象)类型调用不同的处理函数。
1 | // 根据newChild类型选择不同diff函数处理 |
当newChild类型为object、number、string,代表同级只有一个节点
当newChild类型为Array,同级有多个节点
单节点的Diff
1 | function reconcileSingleElement( |
实际例子1
1 | // 更新前 |
currentFiber的值:
1 | { |
组件重新渲染后nextChildren的值:
1 | { |
React 执行单节点 Diff 的过程:
- 对比 key:旧 Fiber 的 key = ‘xxx’,新节点的 key = ‘xxx’ → 相同;
- 对比 type:旧 Fiber 的 type = ‘div’,新节点的 type = ‘div’ → 相同;
- 判定复用:直接复用旧的 Fiber 节点(包括对应的真实 DOM 节点);
- 更新内容:只把 Fiber 节点的 props.children 从 ‘hahaha’ 改成 ‘nonono’,并打上Update的EffectTag
最终渲染:React 只更新真实 DOM 的文本内容,不会删除 / 重建标签。
实际例子2
1
2
3
4// 更新前
<div key="xxx">yesyesyes</div>
// 更新后
<div key="yyy">nonono</div>currentFiber的值:1
2
3
4
5
6
7{
type: 'div', // 节点类型
key: 'xxx', // 节点key
props: { children: 'yesyesyes' }, // 内容
stateNode: 真实DOM节点, // 对应页面上的<div> DOM
// 其他Fiber属性...
}组件重新渲染后
nextChildren的值:1
2
3
4
5
6{
$$typeof: REACT_ELEMENT_TYPE,
type: 'div',
key: 'yyy',
props: { children: 'nonono' }
}React 执行单节点 Diff 的过程:
- 对比 key:旧 Fiber 的 key = ‘xxx’,新节点的 key = ‘xxx’ → 不相同;
- 对比旧 Fiber(key=xxx,type=div)和新节点(key=yyy,type=div):✅ type 相同,但 ❌ key 不同 → 判定 “不可复用”;
- 对旧 Fiber 节点:打上 Deletion effectTag(标记为 “待删除”);
- 为新节点创建全新的 Fiber 节点:打上 Placement effectTag(标记为 “待插入”);
此时不修改任何 DOM,仅完成标记。
多节点的Diff
多节点Diff的几种情况
同级多个节点的Diff,一定属于以上三种情况中的一种或多种。
情况1:节点更新
1
2
3
4
5
6
7
8
9
10
11
12
13
14
15
16
17// 之前
<ul>
<li key="0" className="before">0<li>
<li key="1">1<li>
</ul>
// 之后 情况1 —— 节点属性变化
<ul>
<li key="0" className="after">0<li>
<li key="1">1<li>
</ul>
// 之后 情况2 —— 节点类型更新
<ul>
<div key="0">0</div>
<li key="1">1<li>
</ul>情况2:节点新增或减少
1
2
3
4
5
6
7
8
9
10
11
12
13
14
15
16
17// 之前
<ul>
<li key="0">0<li>
<li key="1">1<li>
</ul>
// 之后 情况1 —— 新增节点
<ul>
<li key="0">0<li>
<li key="1">1<li>
<li key="2">2<li>
</ul>
// 之后 情况2 —— 删除节点
<ul>
<li key="1">1<li>
</ul>情况3:节点位置变化
1
2
3
4
5
6
7
8
9
10
11// 之前
<ul>
<li key="0">0<li>
<li key="1">1<li>
</ul>
// 之后
<ul>
<li key="1">1<li>
<li key="0">0<li>
</ul>多节点Diff的思路
React团队发现,在日常开发中,相较于新增和删除,更新组件发生的频率更高。所以Diff会优先判断当前节点是否属于更新。
基于以上原因,React团队对Diff给出的方案是两轮遍历:- 第一轮遍历:处理更新的节点。
- 第二轮遍历:处理剩下的不属于更新的节点。
第一轮遍历
第一轮遍历步骤如下:
- let i = 0,遍历
newChildren,将newChildren[i]与oldFiber比较,判断DOM节点是否可复用。 - 如果可复用,i++,继续比较
newChildren[i]与oldFiber.sibling,可以复用则继续遍历。 - 如果不可复用,分两种情况:
- key不同导致不可复用,立即跳出整个遍历,第一轮遍历结束。
- key 相同但 type 不同,旧 Fiber 不可复用:将 oldFiber 标记为 Deletion,同时创建 newFiber 并标记 Placement,后续在 commit 阶段完成替换。
- 如果
newChildren遍历完(即i === newChildren.length - 1)或者oldFiber遍历完(即oldFiber.sibling === null),跳出遍历,第一轮遍历结束。
步骤3跳出的遍历
此时newChildren没有遍历完,oldFiber也没有遍历完。
1
2
3
4
5
6
7
8
9// 之前
<li key="0">0</li>
<li key="1">1</li>
<li key="2">2</li>
// 之后
<li key="0">0</li>
<li key="2">1</li>
<li key="1">2</li>第一个节点可复用,遍历到key === 2的节点发现key改变,不可复用,跳出遍历,等待第二轮遍历处理。
此时oldFiber剩下key === 1、key === 2未遍历,newChildren剩下key === 2、key === 1未遍历。
步骤4跳出的遍历
如果是步骤4跳出,有可能是
newChildren遍历完,也可能是oldFiber遍历完,或者同时遍历完,只会是以下几种情况:1
2
3
4
5
6
7
8
9
10
11
12
13
14
15
16
17// 之前
<li key="0" className="a">0</li>
<li key="1" className="b">1</li>
// 之后 情况1 —— newChildren与oldFiber都遍历完
<li key="0" className="aa">0</li>
<li key="1" className="bb">1</li>
// 之后 情况2 —— newChildren没遍历完,oldFiber遍历完
// newChildren剩下 key==="2" 未遍历
<li key="0" className="aa">0</li>
<li key="1" className="bb">1</li>
<li key="2" className="cc">2</li>
// 之后 情况3 —— newChildren遍历完,oldFiber没遍历完
// oldFiber剩下 key==="1" 未遍历
<li key="0" className="aa">0</li>第二轮遍历
对于第一轮的结果,分别讨论
1. newChildren与oldFiber同时遍历完
那就是最理想的情况:只需在第一轮遍历进行组件更新。此时Diff结束。
2. newChildren没遍历完,oldFiber遍历完
已有的DOM节点都复用了,这时还有新加入的节点,意味着本次更新有新节点插入,我们只需要遍历剩下的
newChildren为生成的workInProgress fiber依次标记Placement。3. newChildren遍历完,oldFiber没遍历完
意味着本次更新比之前的节点数量少,有节点被删除了。所以需要遍历剩下的
oldFiber,依次标记Deletion。4. newChildren与oldFiber都没遍历完
这意味着有节点在这次更新中改变了位置。这也就是Diff算法中最复杂的部分
处理移动的节点
单独讨论下第二轮遍历的第四种情况,也就是存在节点在这次更新中改变了位置
核心的操作其实就是:
- 建映射表:遍历旧子 Fiber 链表,生成 key → 旧Fiber 的 Map(无 key 则用索引当 key);
- 遍历新节点:逐个处理新数组中的节点,按 key 找旧节点:
- 找到且 type 一致 → 复用旧 Fiber,记录旧索引,判断是否移动;
- 没找到 → 新建 Fiber(标记 Placement);
- 判定移动:用
lastPlacedIndex(已处理节点的最大旧索引)判断:- 若当前节点的旧索引 <
lastPlacedIndex→ 标记 Placement(需要移动); - 若 ≥ → 更新
lastPlacedIndex为当前旧索引(无需移动);
清理旧节点:遍历映射表中未被复用的旧节点,标记 Deletion(删除);
- 若当前节点的旧索引 <
移动节点的EffectTag是怎么打上的
WIP Fiber 会做 2 件事:
- 按新顺序插入 WIP 树(确定 “该挪到哪”);
- 打 Placement 标记
Current Fiber不会做任何处理。
这里用的EffectTag用的也是Placement,只是在commit阶段会判断WIP Fiber 的 alternate 是否会指向 Current Fiber(关联旧 DOM);如果是,则不会创建新DOM,直接复用旧DOM,否的话相当于插入新节点,会创建新DOM。
例子1
1
2
3
4
5
6
7
8
9
10
11
12
13
14
15
16
17
18
19
20
21
22
23
24
25
26
27
28
29
30
31
32
33
34
35
36
37
38
39
40
41
42
43
44
45
46
47
48
49
50
51
52
53
54
55
56
57
58
59
60
61
62
63
64
65
66
67// 之前
abcd
// 之后
acdb
===第一轮遍历开始===
a(之后)vs a(之前)
key不变,可复用
此时 a 对应的oldFiber(之前的a)在之前的数组(abcd)中索引为0
所以 lastPlacedIndex = 0;
继续第一轮遍历...
c(之后)vs b(之前)
key改变,不能复用,跳出第一轮遍历
此时 lastPlacedIndex === 0;
===第一轮遍历结束===
===第二轮遍历开始===
newChildren === cdb,没用完,不需要执行删除旧节点
oldFiber === bcd,没用完,不需要执行插入新节点
将剩余oldFiber(bcd)保存为map
// 当前oldFiber:bcd
// 当前newChildren:cdb
继续遍历剩余newChildren
key === c 在 oldFiber中存在
const oldIndex = c(之前).index;
此时 oldIndex === 2; // 之前节点为 abcd,所以c.index === 2
比较 oldIndex 与 lastPlacedIndex;
如果 oldIndex >= lastPlacedIndex 代表该可复用节点不需要移动
并将 lastPlacedIndex = oldIndex;
如果 oldIndex < lastplacedIndex 该可复用节点之前插入的位置索引小于这次更新需要插入的位置索引,代表该节点需要向右移动
在例子中,oldIndex 2 > lastPlacedIndex 0,
则 lastPlacedIndex = 2;
c节点位置不变
继续遍历剩余newChildren
// 当前oldFiber:bd
// 当前newChildren:db
key === d 在 oldFiber中存在
const oldIndex = d(之前).index;
oldIndex 3 > lastPlacedIndex 2 // 之前节点为 abcd,所以d.index === 3
则 lastPlacedIndex = 3;
d节点位置不变
继续遍历剩余newChildren
// 当前oldFiber:b
// 当前newChildren:b
key === b 在 oldFiber中存在
const oldIndex = b(之前).index;
oldIndex 1 < lastPlacedIndex 3 // 之前节点为 abcd,所以b.index === 1
则 b节点需要向右移动
===第二轮遍历结束===
最终acd 3个节点都没有移动,b节点被标记为移动例子2
1
2
3
4
5
6
7
8
9
10
11
12
13
14
15
16
17
18
19
20
21
22
23
24
25
26
27
28
29
30
31
32
33
34
35
36
37
38
39
40
41
42
43
44
45
46
47
48
49
50
51
52
53
54
55
56
57
58
59
60
61
62
63
64
65
66
67// 之前
abcd
// 之后
dabc
===第一轮遍历开始===
d(之后)vs a(之前)
key改变,不能复用,跳出遍历
===第一轮遍历结束===
===第二轮遍历开始===
newChildren === dabc,没用完,不需要执行删除旧节点
oldFiber === abcd,没用完,不需要执行插入新节点
将剩余oldFiber(abcd)保存为map
继续遍历剩余newChildren
// 当前oldFiber:abcd
// 当前newChildren dabc
key === d 在 oldFiber中存在
const oldIndex = d(之前).index;
此时 oldIndex === 3; // 之前节点为 abcd,所以d.index === 3
比较 oldIndex 与 lastPlacedIndex;
oldIndex 3 > lastPlacedIndex 0
则 lastPlacedIndex = 3;
d节点位置不变
继续遍历剩余newChildren
// 当前oldFiber:abc
// 当前newChildren abc
key === a 在 oldFiber中存在
const oldIndex = a(之前).index; // 之前节点为 abcd,所以a.index === 0
此时 oldIndex === 0;
比较 oldIndex 与 lastPlacedIndex;
oldIndex 0 < lastPlacedIndex 3
则 a节点需要向右移动
继续遍历剩余newChildren
// 当前oldFiber:bc
// 当前newChildren bc
key === b 在 oldFiber中存在
const oldIndex = b(之前).index; // 之前节点为 abcd,所以b.index === 1
此时 oldIndex === 1;
比较 oldIndex 与 lastPlacedIndex;
oldIndex 1 < lastPlacedIndex 3
则 b节点需要向右移动
继续遍历剩余newChildren
// 当前oldFiber:c
// 当前newChildren c
key === c 在 oldFiber中存在
const oldIndex = c(之前).index; // 之前节点为 abcd,所以c.index === 2
此时 oldIndex === 2;
比较 oldIndex 与 lastPlacedIndex;
oldIndex 2 < lastPlacedIndex 3
则 c节点需要向右移动
===第二轮遍历结束===状态更新
流程概览
创建Update对象
在React中,有如下方法可以触发状态更新
1
2
3
4
5
6
7
8
9ReactDOM.render
this.setState
this.forceUpdate
useState
useReducer每次状态更新都会创建一个保存更新状态相关内容的对象,我们叫他
Update。在render阶段的beginWork中会根据Update计算新的state。Update
Update对象的分类
可以触发更新的方法所隶属的组件分类:
ReactDOM.render —— HostRoot
this.setState —— ClassComponent
this.forceUpdate —— ClassComponent
useState —— FunctionComponent
useReducer —— FunctionComponent
一共三种组件(HostRoot | ClassComponent | FunctionComponent)可以触发更新。
由于不同类型组件工作方式不同,所以存在两种不同结构的Update,其中ClassComponent与HostRoot共用一套Update结构,FunctionComponent单独使用一种Update结构。
Update对象的结构
1
2
3
4
5
6
7
8
9
10
11
12
13
14
15
16const update: Update<*> = {
// 任务时间,通过performance.now()获取的毫秒数
eventTime,
// 优先级相关字段
lane,
// Suspense相关
suspenseConfig,
// 更新的类型,包括UpdateState | ReplaceState | ForceUpdate | CaptureUpdate。
tag: UpdateState,
// 更新挂载的数据
payload: null,
// 更新的回调函数。会在commit 阶段的 layout 被调用
callback: null,
// 与其他Update连接形成链表。
next: null,
};Update与Fiber的联系
Fiber节点上的多个Update会组成链表并被包含在fiber.updateQueue中
什么情况下一个Fiber节点会存在多个Update?
一种最简单的情况:
1
2
3
4
5
6
7
8
9onClick() {
this.setState({
a: 1
})
this.setState({
b: 2
})
}在一个ClassComponent中触发this.onClick方法,方法内部调用了两次this.setState。这会在该fiber中产生两个Update。
updateQueue
1
2
3
4
5
6
7
8
9const queue: UpdateQueue<State> = {
baseState: fiber.memoizedState,
firstBaseUpdate: null,
lastBaseUpdate: null,
shared: {
pending: null,
},
effects: null,
};baseState:本次更新前该Fiber节点的state,Update基于该state计算更新后的state。
firstBaseUpdate与lastBaseUpdate:本次更新前该Fiber节点已保存的Update。以链表形式存在,链表头为firstBaseUpdate,链表尾为lastBaseUpdate。之所以在更新产生前该Fiber节点内就存在 Update,是由于某些Update优先级较低所以在上次render阶段由```Update计算state时被跳过。
shared.pending:触发更新时,产生的Update会保存在shared.pending中形成单向环状链表。当由Update计算state时这个环会被剪开并连接在lastBaseUpdate后面。
effects:数组。保存update.callback !== null的Update。
优先级调度
状态更新由用户交互产生,用户心里对交互执行顺序有个预期。React根据人机交互研究的结果中用户对交互的预期顺序为交互产生的状态更新赋予不同优先级。
具体如下:
生命周期方法:同步执行。
受控的用户输入:比如输入框内输入文字,同步执行。
交互事件:比如动画,高优先级执行。
其他:比如数据请求,低优先级执行。
如何调度优先级
React通过Scheduler调度任务。
具体到代码,每当需要调度任务时,React会调用Scheduler提供的方法
runWithPriority。该方法接收一个优先级常量与一个回调函数作为参数。回调函数会以优先级高低为顺序排列在一个定时器中并在合适的时间触发。
对于更新来讲,传递的回调函数一般为状态更新流程概览一节讲到的render阶段的入口函数。
Scheduler对优先级的定义:
1
2
3
4
5
6
7
8
9export type PriorityLevel = 0 | 1 | 2 | 3 | 4 | 5;
// TODO: Use symbols?
export const NoPriority = 0;
export const ImmediatePriority = 1;
export const UserBlockingPriority = 2;
export const NormalPriority = 3;
export const LowPriority = 4;
export const IdlePriority = 5;优先级最终会反映到
update.lane变量上一个实际的例子:低优更新被高优更新打断
以一个实际例子来讲解 Update 的工作流程和「高优更新插队」。
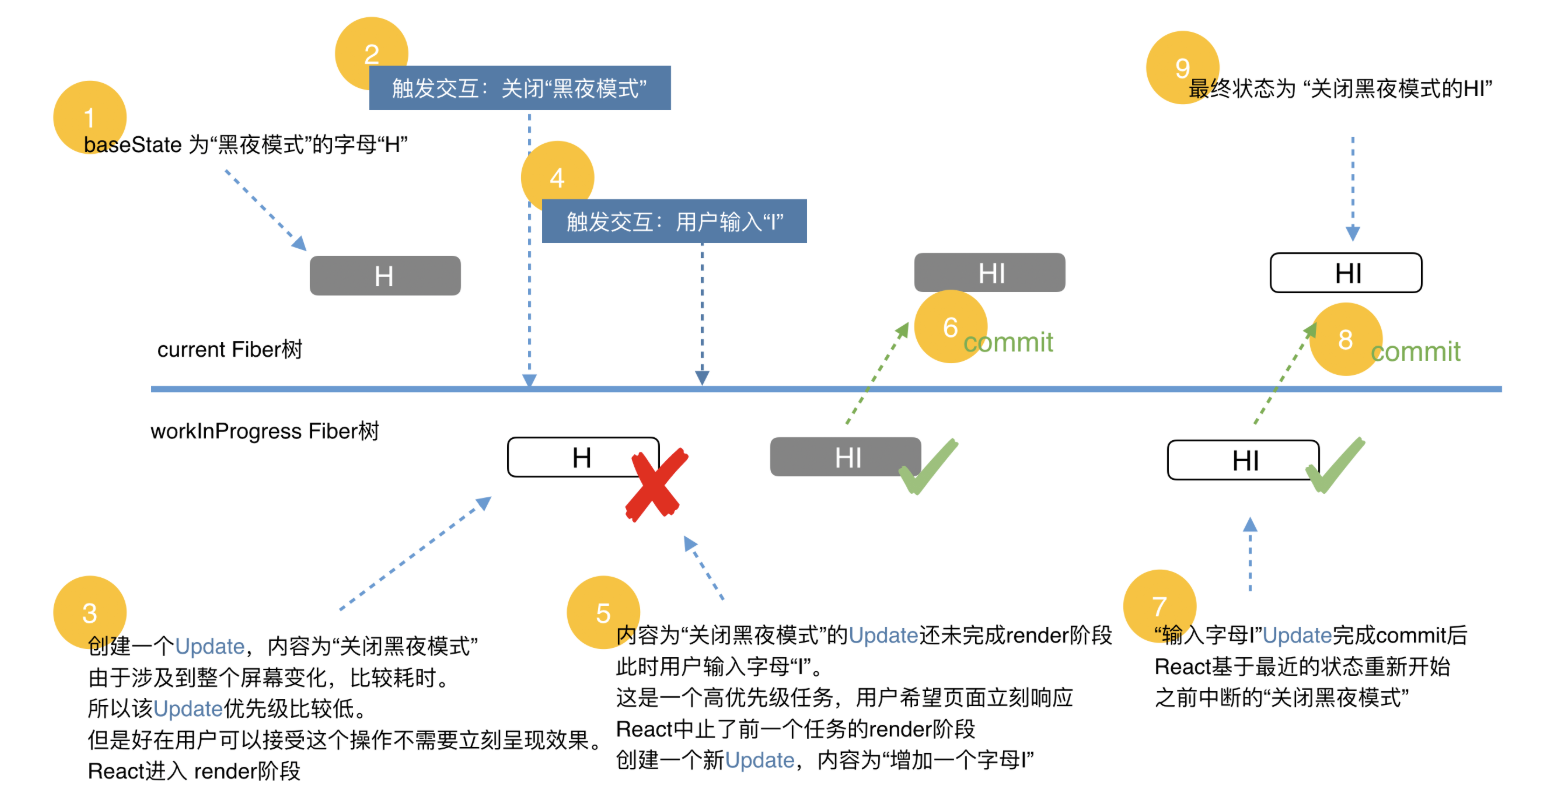
在这个例子中,有两个 Update:
- u1:点击「关闭黑夜模式」产生的更新(低优);
- u2:在输入框中输入字母
"I"产生的更新(高优,受控输入)。
1. 先触发 u1(低优),开始第一轮 render
此时 Fiber 上的
updateQueue大致是:1
2
3
4
5
6
7
8
9
10
11
12fiber.updateQueue = {
baseState: {
blackTheme: true,
text: "H",
},
firstBaseUpdate: null,
lastBaseUpdate: null,
shared: {
pending: u1, // 一个环:u1.next = u1
},
effects: null,
};React 按 u1 的 lane 开始一次低优 render。
2. 渲染 u1 过程中,又来了更高优的 u2
在 u1 完成本轮 render 之前,用户输入
"I",产生了高优的 u2。调度器中断当前低优渲染,准备先处理高优更新。新的
shared.pending变成一个包含 u1、u2 的环形链表:1
2
3
4
5
6fiber.updateQueue.shared.pending === u2 ----> u1
^ |
|________|
// 即:
u2.next === u1;
u1.next === u2;注意:
shared.pending指向最后一个 update(u2),所以剪开环时顺序是u1 → u2。3. 以 u2 的优先级重新进入 render:只处理「本轮 lanes 覆盖到的更新」
现在开始的是「以 u2 的 lane 为 renderLanes」的这一轮 render。在
processUpdateQueue中:- 把
shared.pending的环形链表剪开并接到 baseUpdate 后面,得到:1
baseUpdate: u1 → u2
- 遍历这条 baseUpdate 链时:
- 先看 u1:优先级不在本轮
renderLanes中 → 跳过但不丢弃; - 再看 u2:优先级满足 → 执行 u2 对应的状态更新(把
text从'H'变为'HI')。
- 先看 u1:优先级不在本轮
- 被跳过的 u1(以及它后面的 update)会变成「下一次更新的 baseUpdate 链」,即:
1
2firstBaseUpdate = u1
lastBaseUpdate = u2 // 维护依赖链
这一轮只真正完成了高优 u2 的 render–commit,得到的
updateQueue如下:1
2
3
4
5
6
7
8
9
10
11
12fiber.updateQueue = {
baseState: {
blackTheme: true,
text: "HI",
},
firstBaseUpdate: u1, // 低优的 u1 还没处理
lastBaseUpdate: u2,
shared: {
pending: null, // 本轮 pending 已清空
},
effects: null,
};从用户视角看,此时界面已经是「黑夜模式仍为 true,文本为 ‘HI’」——高优输入立刻生效了。
4. u2 render–commit后,React会再调度 u1的更新,走u1的 render-commit流程
在这轮(高优)渲染里,React 有两个约束:
- 不能在「只处理高优 lanes」的 render 里,顺带执行低优的 u1(否则优先级语义被破坏);
- 但 u1 也不能丢,所以要把它保存在 baseUpdate 链上,稍后单独按它的 lane 再算一轮。
因此,在本轮 commit 结束时,React 会根据
firstBaseUpdate = u1再调度一次更新:- 以
baseState = { blackTheme: true, text: 'HI' }为起点; - 按
u1 → u2这条 baseUpdate 链重新跑一轮 render; - 这次 lanes 覆盖到了 u1,所以会真正执行 u1,把
blackTheme从 true 改为 false。
最终,两次 Update 都完成后的队列大致是:
1
2
3
4
5
6
7
8
9
10
11
12fiber.updateQueue = {
baseState: {
blackTheme: false,
text: "HI",
},
firstBaseUpdate: null,
lastBaseUpdate: null,
shared: {
pending: null,
},
effects: null,
};可以看到:
- u1 对应的状态更新在两轮 render 里都参与了计算(一次被更高优的u2打断,一次再u2执行完后重新调度),因此与之对应的 render 阶段生命周期(如旧版的
componentWillXXX)也会被触发两次; - 这也是为什么这些「Will」类生命周期在 Fiber 并发模式下会被标记为
UNSAFE_:一次更新的 render 过程可能被打断、重做多次,不能再假设「will 只会执行一次」。
如何保证状态正确
在
updateQueue的工作流程中,还会存在两个疑问:- render 阶段可能被中断,
updateQueue里的update会不会丢? - 有的状态依赖前一个状态,跳过低优更新时怎么保证「前后依赖」是连贯的?
如何保证 Update 不丢失
在上面的例子里:在 render 阶段,
shared.pending这条环形链会被剪开并拼到updateQueue.lastBaseUpdate后面。实际上,React 会把它同时接到current.updateQueue.lastBaseUpdate和workInProgress.updateQueue.lastBaseUpdate后面:当 render 阶段被中断、下一次重新开始时:
- 会基于
current.updateQueue克隆出新的workInProgress.updateQueue; - 由于
current.updateQueue.lastBaseUpdate已经保存了上一次的update链,之前的更新不会丢。
- 会基于
当某一轮 commit 阶段完成渲染、
finishedWork变成新的current时:- 新的
current.updateQueue.lastBaseUpdate上也带着「本轮尚未完全消费的 update」; - 后续再从这个
current出发构建下一轮workInProgress时,依然能找回这些 update。
- 新的
简单说:**
update总是先挂到current和workInProgress两边的updateQueue上,即使某次 render 被中断或 wip 树被丢弃,只要current还在,对应的 update 信息就不会丢。**如何保证状态依赖的连续性
当某个
update因为优先级不够在本轮 render 被跳过时,React 不仅会把这个update放进baseUpdate,还会把它后面的所有update一起放进去,保证下次更新时这些update能按正确顺序重新执行。一个简化例子(字母代表要拼接的字符,数字代表优先级,数字越小优先级越高):
1
2baseState: ''
shared.pending: A1 --> B2 --> C1 --> D2第一次 render,优先级 = 1(只处理 1)
1
2
3
4baseState: '';
baseUpdate: null;
render 阶段实际处理的 update: [A1, C1];
memoizedState: 'AC';A1和C1优先级为 1,满足当前renderLanes,被应用到memoizedState上;B2优先级为 2,低于本轮优先级,所以 B2 以及它后面的所有 update(C1、D2)都会被收集进baseUpdate链,作为下一次更新要处理的 update:
1
2// 下一次更新的 baseUpdate 链:
B2-- > C1-- > D2;这么做的原因是:
C1和D2的含义很可能依赖B2先执行(例如多次setState(prev => prev + x)的累加),不能只把 B2 丢掉、单独执行后面的 C1 / D2,否则状态顺序就乱了。第二次 render,优先级 = 2
1
2
3
4baseState: 'A';
baseUpdate: B2 --> C1 --> D2;
render 阶段实际处理的 update: [B2, C1, D2];
memoizedState: 'ABCD';这里有两个细节:
baseState是'A',而不是上一次的memoizedState 'AC':- 因为在第一次 render 里,
B2被跳过了,React 会把「应用到'A'之后的后续 update」折叠进baseState和baseUpdate的组合里; - 换句话说:当有
update被跳过时,下一次更新的baseState !== 上一次的 memoizedState,它是「在跳过点之前的状态」。
- 因为在第一次 render 里,
- 第二次 render 时,按顺序应用
[B2, C1, D2],最终得到'ABCD',和「按 A1、B2、C1、D2 顺序一次性执行」的结果一致。
通过这个过程可以看出:
- 最终状态一定和「用户按顺序触发的所有更新」一致;
- 但中间每一帧能看到的状态(特别是在低配设备、不同调度策略下)可能不完全一致——这也是 React 并发渲染的设计目标之一:宁可中间状态略有差异,也要保证交互响应优先和最终正确性。
高优打断低优的一个小 demo
下面这个例子中,即使
setTimeout(() => updateCount(1), 1000)先 fire,
也会被后续的setTimeout(() => button.click(), 1040)插队:- 初始页面是一堆
0; - 先渲染出一堆
2(button 点击产生的高优更新); - 最终渲染出一堆
3(低优的updateCount(1)在高优更新后被补上)。
1
2
3
4
5
6
7
8
9
10
11
12
13
14
15
16
17
18
19
20
21
22
23
24
25
26
27
28
29
30
31import React, { useEffect, useState, useRef } from "react";
export default () => {
const buttonRef = useRef(null);
const [count, updateCount] = useState(0);
const onClick = () => {
updateCount((count) => count + 2);
};
useEffect(() => {
const button = buttonRef.current;
// 低优先级:1 秒后把 count 设为 1
setTimeout(() => updateCount(1), 1000);
// 略晚一点触发点击事件,优先级更高
setTimeout(() => button.click(), 1040);
}, []);
return (
<div>
<button ref={buttonRef} onClick={onClick}>
增加 2
</button>
<div>
{Array.from(new Array(4500)).map((v, index) => (
<div key={index}>{count}</div>
))}
</div>
</div>
);
};
Hooks
hooks概览
setState更新的本质
上文提到过,
setState更新的本质是创建一个update对象,挂在updateQueue上,见:创建Update对象Hooks创建的Update如何保存
不同于
ClassComponent的实例可以存储数据,对于FunctionComponent,queue存储在哪里呢?
答案是:FunctionComponent对应fiber的memoizedState中。以APP组件为例,使用如下精简的fiber结构:
1
2
3
4
5
6
7type Hook = {
memoizedState: any // 对不同类型的 hook 含义不同
baseState: any // useState/useReducer 用到
baseQueue: Update | null // useState/useReducer 用到
queue: UpdateQueue | null // useState/useReducer 用到
next: Hook | null // 指向下一个 hook
}这里涉及到的
baseState、baseQueue、queue和之前提到类组件的updateQueue含义都是一致的,详细可见:updateQueue1
2
3
4
5
6type Fiber = {
// 保存该FunctionComponent对应的Hooks链表,指向“第一个 hook”
memoizedState: Hook | null
// 指向App函数
stateNode: App,
}对于一个函数组件 fiber:
fiber.memoizedState指向 第一个 hook 节点。- 每个 Hook 通过 next 指向下一个。
- 整个组件里按调用顺序写的 hook(
useState->useEffect->useMemo-> …)就一一对应成这样一条链。
useState简易实现
组件render时重新会调用useState,大体逻辑如下:
1
2
3
4
5
6
7
8
9
10
11
12
13
14
15
16
17
18function useState(initialState) {
// 当前useState使用的hook会被赋值该该变量
let hook;
if (isMount) {
// ...mount时需要生成hook对象
} else {
// ...update时从workInProgressHook中取出该useState对应的hook
}
let baseState = hook.memoizedState;
if (hook.queue.pending) {
// ...根据queue.pending中保存的update更新state
}
hook.memoizedState = baseState;
return [baseState, dispatchAction.bind(null, hook.queue)];
}如何从Fiber上找到对应的hook对象:
1
2
3
4
5
6
7
8
9
10
11
12
13
14
15
16
17
18
19
20
21
22
23
24if (isMount) {
// mount时为该useState生成hook
hook = {
queue: {
pending: null,
},
memoizedState: initialState,
next: null,
};
// 将hook插入fiber.memoizedState链表末尾
if (!fiber.memoizedState) {
fiber.memoizedState = hook;
} else {
workInProgressHook.next = hook;
}
// 移动workInProgressHook指针
workInProgressHook = hook;
} else {
// update时找到对应hook
hook = workInProgressHook;
// 移动workInProgressHook指针
workInProgressHook = workInProgressHook.next;
}当找到该
useState对应的hook后,如果该hook.queue.pending不为空(即存在update),则更新其state:1
2
3
4
5
6
7
8
9
10
11
12
13
14
15
16
17
18
19
20
21
22// update执行前的初始state
let baseState = hook.memoizedState;
if (hook.queue.pending) {
// 获取update环状单向链表中第一个update
let firstUpdate = hook.queue.pending.next;
do {
// 执行update action
const action = firstUpdate.action;
baseState = action(baseState);
firstUpdate = firstUpdate.next;
// 最后一个update执行完后跳出循环
} while (firstUpdate !== hook.queue.pending.next);
// 清空queue.pending
hook.queue.pending = null;
}
// 将update action执行完后的state作为memoizedState
hook.memoizedState = baseState;本质上就是:
- 从fiber上的
queue.pending找到对应update - 根据
update计算生成新的state - 更新fiber上对应hook的
baseState - 返回最新的
state
这里的useState与React的区别:
- React Hooks有中途跳过更新的优化手段
- React Hooks有
batchedUpdates - React Hooks的update有优先级概念,可以跳过不高优先的update。
useEffect
在 commit 阶段把 effect 收集好,交给调度器排到当前帧 DOM 提交和浏览器绘制之后再用任务队列(MessageChannel + scheduler)统一执行。
useMemo和useCallback实现
Concurrent Mode
Scheduler
Scheduler 主要包含两个能力:时间切片 和 优先级调度。Scheduler本质上想实现的是在每一帧中只占用一部分的时间来执行任务,并能在下一帧重新拉起任务
时间切片
在 Fiber 出现之前,React 的渲染是“不可中断”的:
- 一次更新会从根节点开始递归遍历整个组件树;
- 中间不能被打断,直到整棵树 diff + 计算完成;
- 这段时间内 JS 长时间占用主线程,容易造成页面卡顿(这一帧 16.7ms 全被 JS 占满,浏览器没空做回流重绘)。
Fiber + Scheduler 出现之后,渲染被拆成了一个个 Unit Of Work(工作单元),配合 Scheduler 实现了“时间切片(Time Slicing)”:
1
2
3
4
5
6
7
8
9
10
11
12
13
14
15// 伪代码:每次只干一小会儿,不够再下次继续
function workLoop(deadline) {
while (nextUnitOfWork && deadline.timeRemaining() > 0) {
// 处理一个 Fiber(beginWork + completeWork 的一小步)
nextUnitOfWork = performUnitOfWork(nextUnitOfWork);
}
if (nextUnitOfWork) {
// 还有 Fiber 没处理完,把“下一轮继续干活”排进事件循环
requestHostCallback(workLoop); // 内部优先用 MessageChannel,退化用 setTimeout
} else if (rootHasCompletedWork) {
// 渲染完成,进入 commit 阶段(同样在某次 JS 任务中同步执行)
commitRoot();
}
}关键点:
- 最小工作单元是一个 Fiber:
performUnitOfWork只处理一个 Fiber 的 beginWork / completeWork; - 控制“这一轮能干多久”:
- 每次循环后调用
deadline.timeRemaining()/shouldYieldToHost(); - 当前帧时间快用完了就中断本轮
workLoop,把控制权还给浏览器(让浏览器有时间做事件处理 + 回流重绘);
- 每次循环后调用
- 中断后要能恢复:
- 不能只是
return,还要通过 MessageChannel /setTimeout再排一个宏任务,下次继续调用workLoop。
- 不能只是
效果就是:
- 大渲染任务被拆成很多小片段,可能跨多帧完成;
- 中间可以插入用户事件、布局、绘制等更重要的工作;
- 渲染是 可中断、可恢复 的(依赖 Fiber 的
alternate/ 双缓冲机制),而不是一口气锁死主线程。
从“一帧”的角度看,可以近似理解为:React 在每一帧里尽量只占用几毫秒(当然具体时间是根据动态估算的,一般60hz的浏览器下是5ms)做 render 工作,剩余时间留给浏览器完成 layout/paint。
优先级调度:先做更重要的任务
需要明确的一点是,
scheduler是独立于 React 的包,它不关心 Fiber / lane,只关心“任务 + 任务优先级”。Scheduler 对外暴露了一个方法
unstable_runWithPriority,用来设置“当前上下文”的优先级:1
2
3
4
5
6
7
8
9
10
11import {
unstable_runWithPriority,
unstable_getCurrentPriorityLevel,
unstable_UserBlockingPriority,
} from 'scheduler';
unstable_runWithPriority(unstable_UserBlockingPriority, () => {
// 这里的回调和它里面再调度出来的任务,都会带着 UserBlocking 优先级
const p = unstable_getCurrentPriorityLevel(); // => UserBlocking
// React 内部会根据当前 scheduler 的优先级,映射到对应的更新 lane
});在 React 内部,大部分调度入口都会包一层
runWithPriority:- DOM 事件(click、change、input) →
UserBlockingPriority或ImmediatePriority; - 一般的异步更新 →
NormalPriority; - 低价值 / 背景任务 →
LowPriority/IdlePriority。
Scheduler 把这些“渲染 root 的任务”放到一个 最小堆(小顶堆) 里,每个任务会记录:
priorityLevel:Immediate / UserBlocking / Normal / Low / Idle;startTime:何时可以开始执行;expirationTime:最晚何时必须执行。
调度时的大致流程:
- 过滤出“已经到开始时间”的任务;
- 在这些任务中,选择 优先级最高 / 过期时间最早 的一个执行;
- 在执行过程中(
performWorkUntilDeadline→workLoop)不断检查当前帧剩余时间,必要时中断,把没做完的部分留到下一次调度继续。
不同优先级的排序
Scheduler 内部定义了几档优先级(以 18 为例,大致如下):
ImmediatePriority:立即执行,同步任务,不能被饿死;UserBlockingPriority:用户阻塞优先级,如输入、点击触发的更新;NormalPriority:一般优先级,大部分异步更新;LowPriority:低优先级,可以明显延后;IdlePriority:空闲优先级,只有在浏览器非常空闲时才执行。
结合我们日常写代码里的场景,可以大致这样对应:
- legacy 模式(
ReactDOM.render)下,大部分setState都会走同步更新,效果类似ImmediatePriority,直接一口气 render+commit 完成,不做时间切片; - 并发 root(
createRoot)下:- 离散事件里的
setState(click、input 等)通常会映射到 Sync / UserBlocking 这一档,表现为“看上去是同步生效”,但底层仍经过 Scheduler,可以在某些边界被中断重算; startTransition包裹里的setState会被分配到 Transition 相关的 lanes,对应 Scheduler 的Normal/Low一档,是典型的可时间切片的并发更新,可以被打断、延后甚至丢弃重算;Promise.then/setTimeout/useEffect回调等“提交之后的异步环境”里的setState,在 React 18 中也会默认走自动批量 + 并发,通常映射到NormalPriority/ Default lane,属于可以时间切片的更新(优先级低于用户交互,高于 Transition/Idle);- 一些完全不着急的后台任务(如日志、预加载)如果用 Scheduler 显式安排,才适合挂到
LowPriority/IdlePriority,只在浏览器比较空闲的时候、以小时间片慢慢执行。
- 离散事件里的
从高到低大致为:
1
Immediate > UserBlocking > Normal > Low > Idle
React 自己的 Lane 模型会再在这一层之上做一次抽象:
- Lane 表示 React 内部的“更新类型 / 语义优先级”(哪些更新属于 Sync、哪些属于 Transition 等);
- Scheduler 的 priority 表示 JS 任务层面的“调度优先级”(这个 root 的 render 任务在事件循环里有多着急);
- React 在调度更新时,会先在自己内部通过
getNextLanes决定“这次 render 处理哪些 lanes(renderLanes)”,然后把这些 lanes 映射成一个 Scheduler 的priorityLevel,交给 Scheduler 去安排“这个 root 的 render 任务”在宏任务队列中的执行时机。“选哪些 lane 参与本次 render”是 React 做的事,Scheduler 并不关心 lane。
Lane模型
表示优先级的不同
Lane 模型是 React 在并发模式下用来表示“更新优先级 + 更新类别”的一套抽象,本质上是一个 bitmask(位掩码):
- 每一位(一个 bit)代表一条“车道(lane)”;
- 不同的 lane 有不同的语义(同步更新、连续输入、默认、Transition、Idle 等);
- 一个更新会被分配到某一个(或某几个) lane 上。
在代码层面,大致类似:
1
2
3
4
5
6
7
8
9
10
11
12
13type Lane = number; // 实际是 31 位 bitmask
type Lanes = number; // 一组 lane 的并集
// 举例(简化伪代码)
const SyncLane = 0b0000001;
const InputLane = 0b0000010;
const DefaultLane = 0b0000100;
const TransitionLane = 0b0001000;
const IdleLane = 0b0010000;
// 一个 fiber 上可能同时挂着多个未完成更新:
fiber.lanes = SyncLane | TransitionLane;
fiber.childLanes = SyncLane | DefaultLane;Lane 相比老的“单一优先级数值”的优势:
可以同时表示多个更新类别:
- 一次 render 可以处理多个 lane 的更新(
renderLanes是一个 lanes 集合);
易于合并与拆分:
- 多个更新可以打在同一条 lane 上(同优先级);
- 某次调度可以一次性“吃掉”一组 lane;
方便按语义做特殊处理:
SyncLane:必须立刻处理的同步更新;TransitionLanes:可以中断、可以延后的过渡更新;IdleLanes:只有页面很空闲时才处理。
代码实现 vDom Fiber Diff 完整版
1
2
3
4
5
6
7
8
9
10
11
12
13
14
15
16
17
18
19
20
21
22
23
24
25
26
27
28
29
30
31
32
33
34
35
36
37
38
39
40
41
42
43
44
45
46
47
48
49
50
51
52
53
54
55
56
57
58
59
60
61
62
63
64
65
66
67
68
69
70
71
72
73
74
75
76
77
78
79
80
81
82
83
84
85
86
87
88
89
90
91
92
93
94
95
96
97
98
99
100
101
102
103
104
105
106
107
108
109
110
111
112
113
114
115
116
117
118
119
120
121
122
123
124
125
126
127
128
129
130
131
132
133
134
135
136
137
138
139
140
141
142
143
144
145
146
147
148
149
150
151
152
153
154
155
156
157
158
159
160
161
162
163
164
165
166
167
168
169
170
171
172
173
174
175
176
177
178
179
180
181
182
183
184
185
186
187
188
189
190
191
192
193
194
195
196
197
198
199
200
201
202
203
204
205
206
207
208
209
210
211
212
213
214
215
216
217
218
219
220
221
222
223
224
225
226
227
228
229
230
231
232
233
234
235
236
237
238
239
240
241
242
243
244
245
246
247
248
249
250
251
252
253
254
255
256
257
258
259
260
261
262
263
264
265//vdom
const React = {
createElement(type, props = {}, ...children) {
return {
type,
props: {
...props,
children: children.map(child =>
typeof child === 'object'
? child
: React.createTextElement(child)
),
},
};
},
createTextElement(text) {
return {
type: 'TEXT_ELEMENT',
props: {
nodeValue: text,
children: [],
},
};
},
};
// const vdom = React.createElement('div', { id: 1 }, React.createElement('span', null, '大伟'));
// console.log(vdom)
//Fiber 是 React 16 引入的一种新的协调引擎
let nextUnitOfWork = null; // 下一个工作单元
let currentRoot = null; // 当前 Fiber 树的根
let wipRoot = null; // 正在工作的 Fiber 树
let deletions = null; // 存储需要删除的 Fiber
// Fiber 渲染入口
function render(element, container) {
//wipRoot 表示“正在进行的工作根”,它是 Fiber 架构中渲染任务的起点
wipRoot = {
dom: container, //渲染目标的 DOM 容器
props: {
children: [element], //要渲染的元素(例如 React 元素)
},
alternate: currentRoot,
//alternate 是 React Fiber 树中的一个关键概念,用于双缓冲机制(双缓冲 Fiber Tree)。currentRoot 是之前已经渲染过的 Fiber 树的根,wipRoot 是新一轮更新的根 Fiber 节点。
//它们通过 alternate 属性相互关联
//旧的fiber树
};
nextUnitOfWork = wipRoot;
//nextUnitOfWork 是下一个要执行的工作单元(即 Fiber 节点)。在这里,将其设置为 wipRoot,表示渲染工作从根节点开始
deletions = [];
//专门用于存放在更新过程中需要删除的节点。在 Fiber 更新机制中,如果某些节点不再需要,就会将它们放入 deletions,
//最后在 commitRoot 阶段将它们从 DOM 中删除
}
// 创建 Fiber 节点
function createFiber(element, parent) {
return {
type: element.type,
props: element.props,
parent,
dom: null, // 关联的 DOM 节点
child: null, // 子节点
sibling: null, // 兄弟节点
alternate: null, // 对应的前一次 Fiber 节点
effectTag: null, // 'PLACEMENT', 'UPDATE', 'DELETION'
};
}
// 创建 DOM 节点
function createDom(fiber) {
const dom =
fiber.type === 'TEXT_ELEMENT'
? document.createTextNode('')
: document.createElement(fiber.type);
updateDom(dom, {}, fiber.props);
return dom;
}
// 更新 DOM 节点属性
function updateDom(dom, prevProps, nextProps) {
// 移除旧属性
Object.keys(prevProps)
.filter(name => name !== 'children')
.forEach(name => {
dom[name] = '';
});
// 添加新属性
Object.keys(nextProps)
.filter(name => name !== 'children')
.filter(name => prevProps[name] !== nextProps[name])
.forEach(name => {
dom[name] = nextProps[name];
});
}
// Fiber 调度器
// 实现将耗时任务拆分成多个小的工作单元
function workLoop(deadline) {
//deadline 表示浏览器空闲时间
let shouldYield = false;
//是一个标志,用来指示是否需要让出控制权给浏览器。如果时间快用完了,则设为 true,以便及时暂停任务,避免阻塞主线程
while (nextUnitOfWork && !shouldYield) {
nextUnitOfWork = performUnitOfWork(nextUnitOfWork);
//performUnitOfWork 是一个函数,它处理当前的工作单元,并返回下一个要执行的工作单元。每次循环会更新 nextUnitOfWork 为下一个工作单元
shouldYield = deadline.timeRemaining() < 1;
//使用 deadline.timeRemaining() 来检查剩余的空闲时间。如果时间少于 1 毫秒,就设置 shouldYield 为 true,表示没有空闲时间了,就让出控制权
}
if (!nextUnitOfWork && wipRoot) {
//当没有下一个工作单元时(nextUnitOfWork 为 null),并且有一个待提交的“工作根”(wipRoot),就会调用 commitRoot() 将最终的结果应用到 DOM 中
commitRoot();
}
requestIdleCallback(workLoop);
//使用 requestIdleCallback 来安排下一个空闲时间段继续执行 workLoop,让任务在浏览器空闲时继续进行
}
//requestIdleCallback 浏览器绘制一帧16ms 空闲的时间去执行的函数 浏览器自动执行
//浏览器一帧做些什么
//1.处理时间的回调click...事件
//2.处理计时器的回调
//3.开始帧
//4.执行requestAnimationFrame 动画的回调
//5.计算机页面布局计算 合并到主线程
//6.绘制
//7.如果此时还有空闲时间,执行requestIdleCallback
requestIdleCallback(workLoop);
// 执行一个工作单元
function performUnitOfWork(fiber) {
// 如果没有 DOM 节点,为当前 Fiber 创建 DOM 节点
if (!fiber.dom) {
fiber.dom = createDom(fiber);
}
//确保每个 Fiber 节点都在内存中有一个对应的 DOM 节点准备好,以便后续在提交阶段更新到实际的 DOM 树中
// 创建子节点的 Fiber
// const vdom = React.createElement('div', { id: 1 }, React.createElement('span', null, '大伟'));
// 子节点在children中
const elements = fiber.props.children;
reconcileChildren(fiber, elements);
// 返回下一个工作单元(child, sibling, or parent)
if (fiber.child) {
return fiber.child;
}
let nextFiber = fiber;
while (nextFiber) {
if (nextFiber.sibling) {
return nextFiber.sibling;
}
nextFiber = nextFiber.parent;
}
return null;
}
// Diff 算法: 将子节点与之前的 Fiber 树进行比较
function reconcileChildren(wipFiber, elements) {
let index = 0;//
let oldFiber = wipFiber.alternate && wipFiber.alternate.child; // 旧的 Fiber 树
let prevSibling = null;
while (index < elements.length || oldFiber != null) {
const element = elements[index];
let newFiber = null;
// 比较旧 Fiber 和新元素
const sameType = oldFiber && element && element.type === oldFiber.type
//如果是同类型的节点,复用
if (sameType) {
newFiber = {
type: oldFiber.type,
props: element.props,
dom: oldFiber.dom,
parent: wipFiber,
alternate: oldFiber,
effectTag: 'UPDATE',
};
}
//如果新节点存在,但类型不同,新增fiber节点
if (element && !sameType) {
newFiber = createFiber(element, wipFiber);
newFiber.effectTag = 'PLACEMENT';
}
//如果旧节点存在,但新节点不存在,删除旧节点
if (oldFiber && !sameType) {
oldFiber.effectTag = 'DELETION';
deletions.push(oldFiber);
}
//移动旧fiber指针到下一个兄弟节点
if (oldFiber) {
oldFiber = oldFiber.sibling;
}
// 将新fiber节点插入到DOM树中
if (index === 0) {
//将第一个子节点设置为父节点的子节点
wipFiber.child = newFiber;
} else if (element) {
//将后续子节点作为前一个兄弟节点的兄弟
prevSibling.sibling = newFiber;
}
//更新兄弟节点
prevSibling = newFiber;
index++;
}
}
// 提交更新到 DOM
function commitRoot() {
deletions.forEach(commitWork); // 删除需要删除的 Fiber 节点
commitWork(wipRoot.child);
currentRoot = wipRoot;
wipRoot = null;
}
// 提交单个 Fiber 节点
function commitWork(fiber) {
if (!fiber) {
return;
}
const domParent = fiber.parent.dom;
if (fiber.effectTag === 'PLACEMENT' && fiber.dom != null) {
domParent.appendChild(fiber.dom);
} else if (fiber.effectTag === 'UPDATE' && fiber.dom != null) {
updateDom(fiber.dom, fiber.alternate.props, fiber.props);
} else if (fiber.effectTag === 'DELETION') {
domParent.removeChild(fiber.dom);
}
commitWork(fiber.child);
commitWork(fiber.sibling);
}
//测试
// render(React.createElement('h1', null, 'hello world'), document.getElementById('root'));
// 测试用例diff
render(React.createElement('div', { id: 1 }, React.createElement('span', null, '大伟')), document.getElementById('root'));
setTimeout(() => {
render(React.createElement('div', { id: 1 }, React.createElement('p', null, '小伟')), document.getElementById('root'));
}, 2000);