ProseMirror学习
ProseMirror
- prosemirror-model
- prosemirror-state
- prosemirror-view
- prosemirror-transform
Schema
Schema 描述的是:这篇文档允许出现哪些结构——能有哪些节点(Node)、哪些标记(Mark),以及它们之间如何嵌套、谁里能装谁
创建 Schema 大致是
1 | new Schema({ |
Schema 由两部分 Spec 组成,实例化后会编译成可查询的类型表:
Nodes
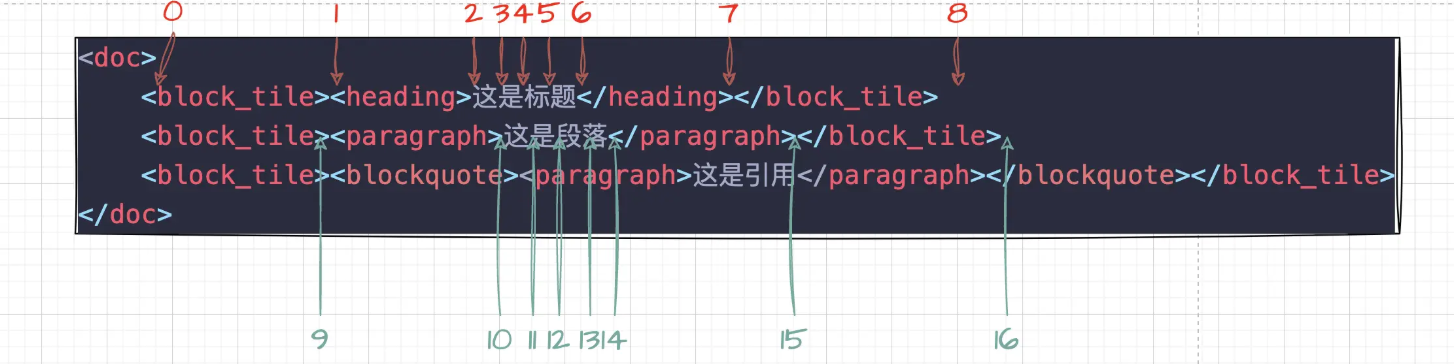
- 必须包含一个根节点(通常叫
doc),Schema 会把它记为schema.topNode,代表整篇文档的最外层类型。 content:内容表达式,规定该节点允许哪些子节点、以什么顺序出现(语法类似正则,如block+表示至少一个 block,inline*表示 0 个或多个 inline)。group:给节点打标签,便于在content里按组引用(如paragraph标为block,text标为inline)。inline/block与 HTML 的 inline / block 概念相近;tile(如后文的block_tile)则是业务自定义分组,并非 ProseMirror 内置。
Marks
- 描述可叠加在文本上的样式或语义(加粗、链接等),不参与文档的树形嵌套,而是附着在 inline 内容上。
编译结果
schema.nodes/schema.marks:由名字查到NodeType/MarkType,类型对象上已解析好 content 规则、默认属性等,后续用它们创建文档节点。
1 | import { Schema } from 'prosemirror-model'; |
从现象看,prosemirror 会寻找到第一个定义的 block 元素来初始化默认的 state。因此,在定义 schema 的时候,需要注意两点:
- Schema 中必要的节点要定义
- 节点的定义顺序可能会影响编辑器初始内容
schema中的工具方法
- schema.cached 中绑定的 domParser 可以将 dom 节点解析为 node 节点
- domSerializer 可以将 node 内容序列化为 dom 节点。
Node
对于 Node 的类型,只有两种,即 block 与 inline
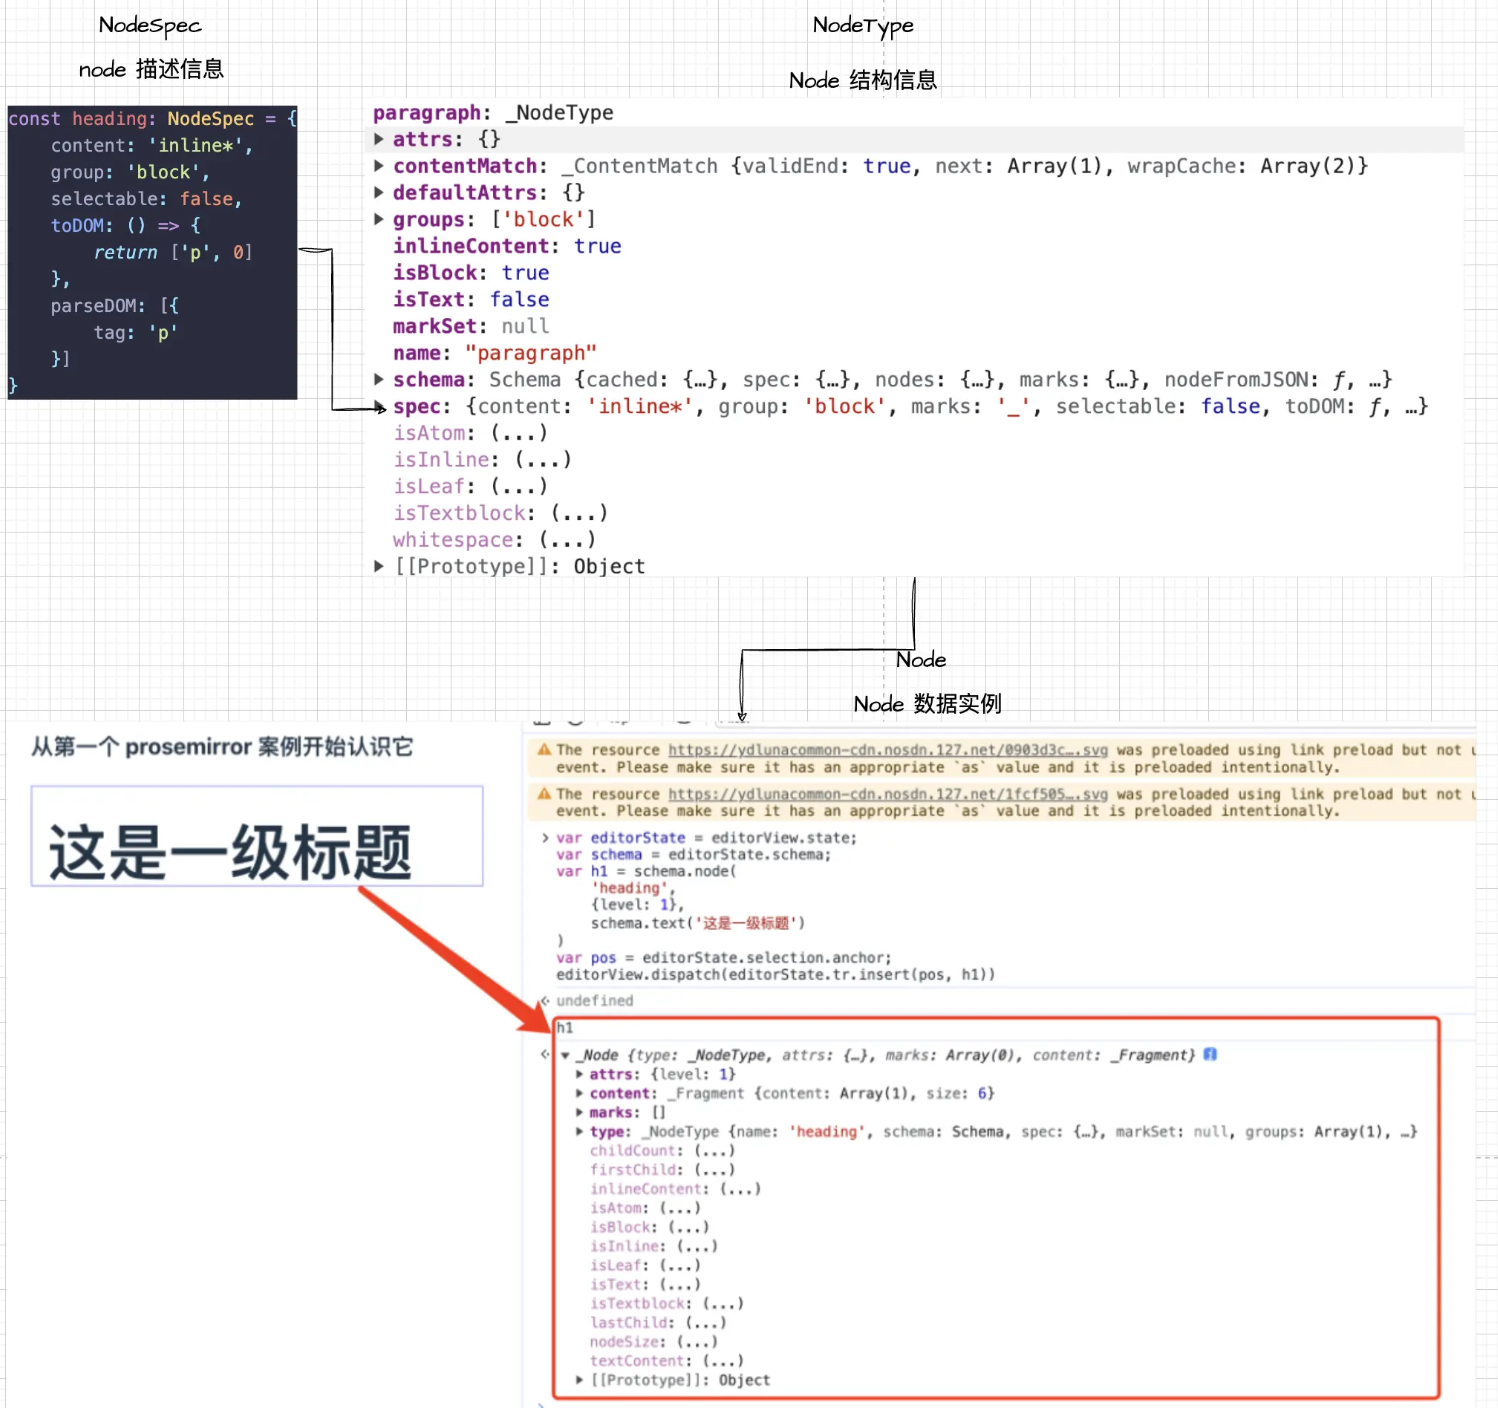
NodeType、NodeSpec、Node概念
- NodeSpec 就是之前在 Schema 中填写的 Node 相关的描述
- NodeType 是 Schema 实例化过程中,根据传入的 nodeSpec 规格说明书创建的 NodeType 实例,可以认为是 node 数据的工厂,后续所有的 node 类型都需要遵循它的定义,它也能像帮我们创造出一个 node 数据
- 最后生成的 Node 实例则是文档中对应到 dom 的一个具体数据
inline 元素与 block 元素不能混合,即 content 里面要么只能是 inline 类型的,要么只能是 block 类型的,不能混合排列,如 paragraph|text* 就会报错。
定义Node
1 | { |
通过API插入Node
1 | import { EditorView } from "prosemirror-view"; |
解析复制进来的HTML
parseDOM字段,根据优先级匹配
Node中的其他特殊属性
defining
defining: true 告诉编辑器当前这种这种块在改文档时要保留结构,好让粘贴、拆分等默认行为时会带上结构
为一个块增加了 defining 定义后,复制这个块中的内容,粘贴进其他块(且该块内容全选或者是一个空的块)的时候,会将当前块转换为加了 defining 的块,然后将文本粘贴进去。当从其他块中复制了内容,要粘贴到 defining 中时候,仅仅会替换文本。
isolating
添加了 isolating 后,在当前块内删除元素,删到头的时候,再按删除也无法删除当前块;
并且复制了 defining 块的内容,也会按照 isolating: true 的 node 的结构渲染
draggable 与 selectable
draggable 控制元素是否可以被拖拽(默认不行),selectable 控制元素是否可以被选中
atom
atom 为原子化,则代表其为一个最小单元,这种类型的节点,内部就不应该有可编辑的内容了,它的 content 属性也不需要再声明了,它的 nodeSize 大小始终都是1,会被 prosemirror 作为独立的单元对待
Mark
Node 主要是用来构成 Prosemirror 的文档结构的,而 Marks 主要是用来设置文本格式的
Mark的定义
在 Prosemirror 中,Mark 的定义最关心的两个属性是 toDOM(类似 React 中定义组件,node用什么html来渲染) 与 parseDOM(解析粘贴进来的 html)
对于 parseDOM,其规则则与 Node 中的规则完全一致,特别注意的是下面使用的 getAttrs,在通过 tag 匹配内容时, getAttrs 参数为 domNode,通过 style 匹配规则时,参数为字符串,字符串是对应 style 的值。getAttrs 返回 false 表示当前规则不匹配,不匹配的则不会被解析为当前的 mark,返回 undefined 或 null 则会为当前 mark 创建一个空的 attrs,如果正常返回内容,返回的内容则为从当前规则中解析出来的 attrs。
1 | const schema = new Schema({ |
NodeSpec中的Mark字段
Mark 的实际操作与特殊属性
实现加粗斜体等样式demo
Mark中的特殊属性
inclusive
控制 mark 结尾继续输入是否延续 mark 效果
excludes
设置当前 mark 的互斥 mark
spanning
是否允许跨越多个节点
Selection
Prosemirror 中的光标系统
Prosemirror 中的光标系统是基于 Node 算的
Prosemirror 中的 Selection
鼠标开始点击的地方叫做 anchor 锚点(下锚定住的基本点),鼠标选择结束后停止的地方叫做 head 头部
还有 from 与 to,是不分方向的,from 始终是小的那一边,to 始终是大的那一边
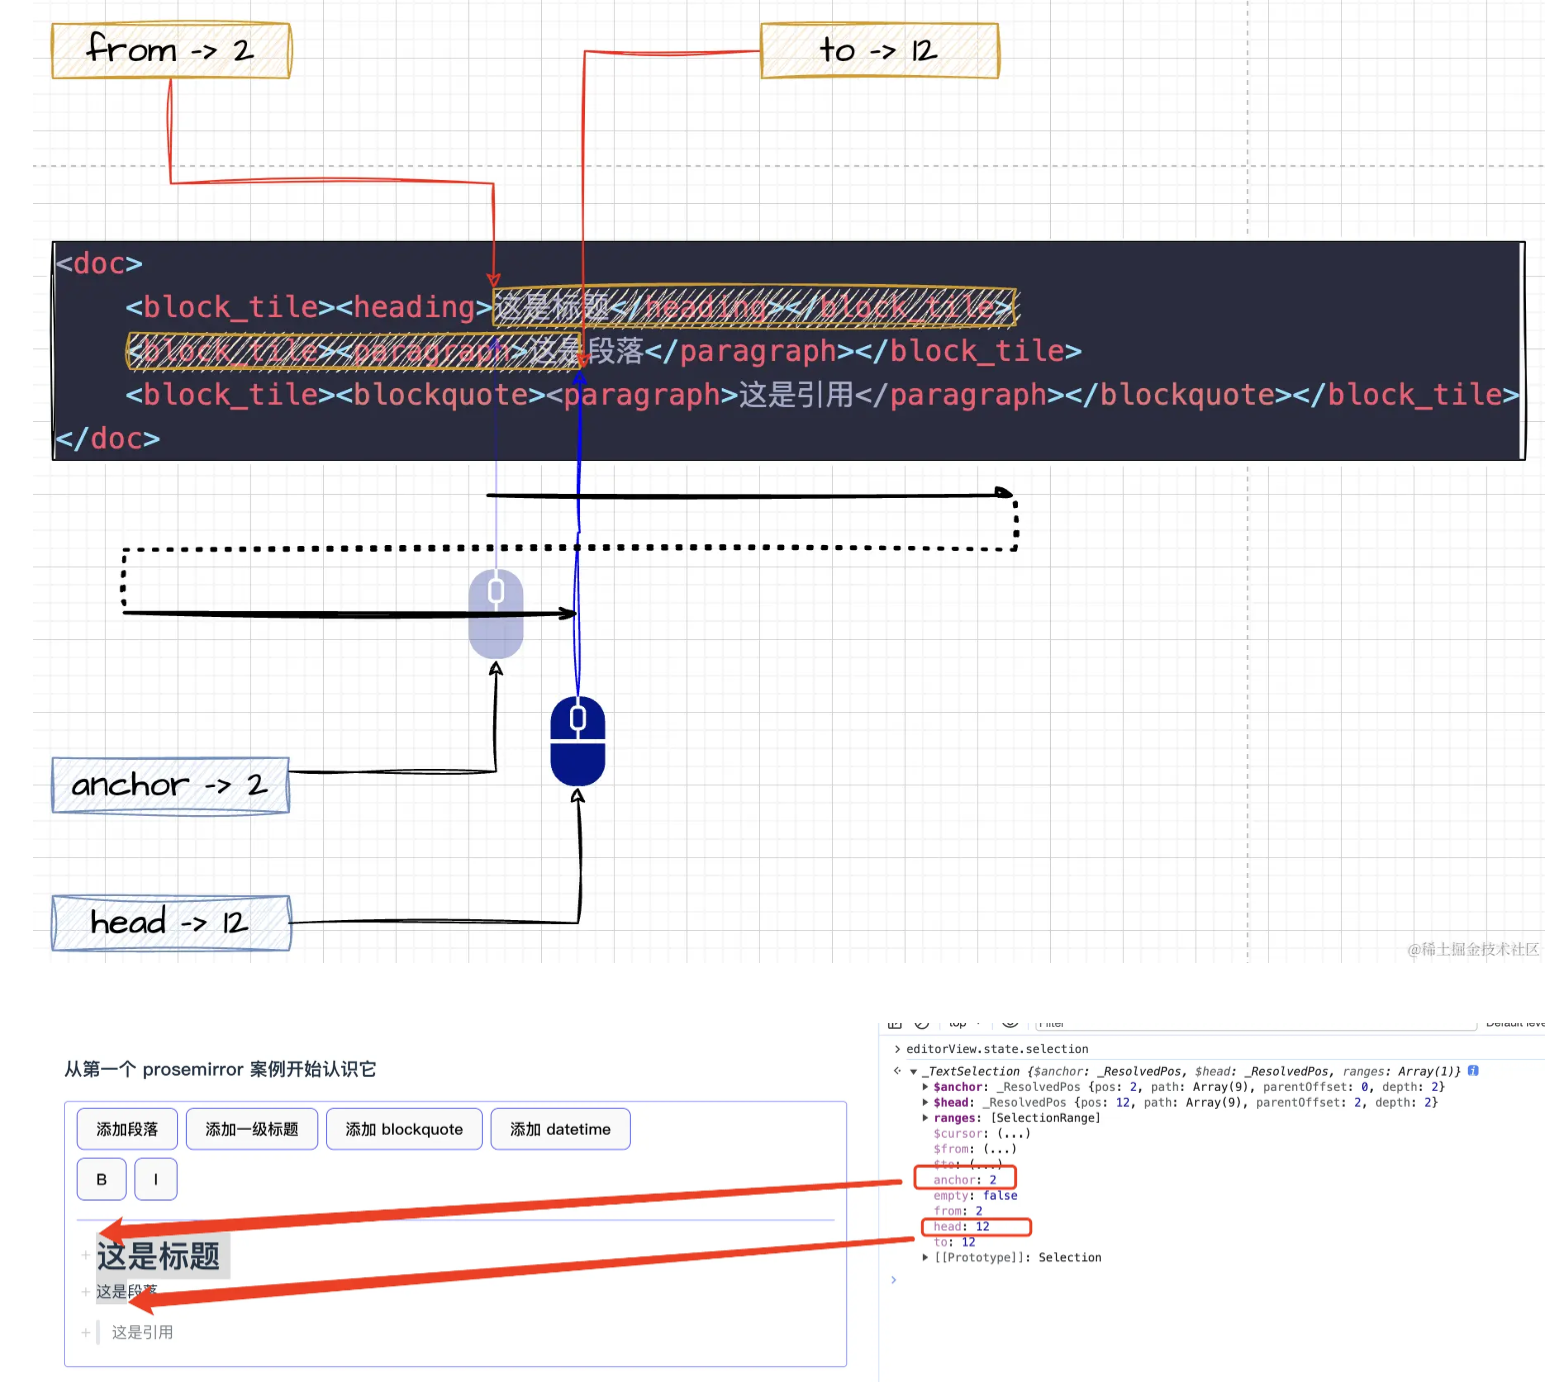
当仅仅是光标时,这几个值都是相同的,并且 empty 时 true。
还有一套带 $ 符号,命名相同的变量,存在当前这个 pos 位置的更丰富的信息:例如当前位置的 depth,pos,父元素 parent,后面一个节点 nodeAfter, 前面一个节点 nodeBefore,以及 path 当前节点的路径等。通常需要根据一个位置快速获取到当前位置的节点是什么,这个 api 计算的结果就很有用
Range 与 Selection 的区别
Plugin
Command是什么
本质上是个函数签名,绑定事件,拦截事件,修改ProseMirror视图
1 | /// Commands are functions that take a state and a an optional |
Command实现原理
在 Prosemirror 中,将 Command 定义为一种类型是为了给大家提供一个命令的标准或协议,即一种规范,但并没有实际实现它。Command 的实现是在 prosemirror-keymap 包中完成的,而 keymap 则是一个插件。使用起来非常简单,通过 {key: command} 的键值对将快捷键与命令绑定,按下对应的按键时,就会执行相应的 Command。
false:当前状态不满足
true:命令适用;若提供了 dispatch,则已完成修改
Plugin
Plugin组成
能力 作用
- key: PluginKey
- state: { init, apply }
- props
- view(view) => PluginView
- filterTransaction
- appendTransaction
Plugin生命周期
- EditorState.create({ plugins: […] }):对每个插件调 state.init,得到初始插件状态。
- 用户输入或代码 dispatch(tr):EditorState.apply(tr) 依次更新文档、选区、各插件 state.apply、以及插件里其它钩子约定。
- new EditorView(…, { state }):对每个带 view 的插件创建 PluginView,之后每次文档/状态更新会调 PluginView.update(若存在)。
- view.destroy():各 PluginView.destroy 做清理。
定制UI
ProseMirror中定制UI的方法
Schema中的toDOM
定义在schema里,实现简单
NodeView 和 MarkView
一个 NodeView 通常包括:
- 创建 DOM — 返回 { dom, contentDOM? }
- dom:这个节点对应的外层元素
- contentDOM(可选):子内容(如段落里的文字)插在这里;没有则表示 atom 节点,内容不可编辑
- 更新 — Node 的 attrs 变了,怎么更新 DOM
- 选区 / 光标 — 点击、聚焦时的行为
- 销毁 — 节点从文档移除时清理(解绑事件等)
- (可选)忽略某些 mutation — 防止 ProseMirror 和你手动改的 DOM 冲突
1 | function codeBlockViewConstructor(node, view, getPos) { |
Decoration 设置样式
Decoration(装饰) 是 ProseMirror 在 View 层 给文档某段位置「加视觉效果或额外 DOM」的机制。
- Decoration.inline — 行内样式
- Decoration.widget — 插入 DOM 小部件
- Decoration.node — 整块节点样式
核心特点包括:
- 不影响文档结构。不影响位置计算、node.textContent,只浮于表面
- 每次tr的提交,decoration都会重新执行
- 适合搜索高亮、拼写错误下划线、协作光标、评论锚点等 临时 UI
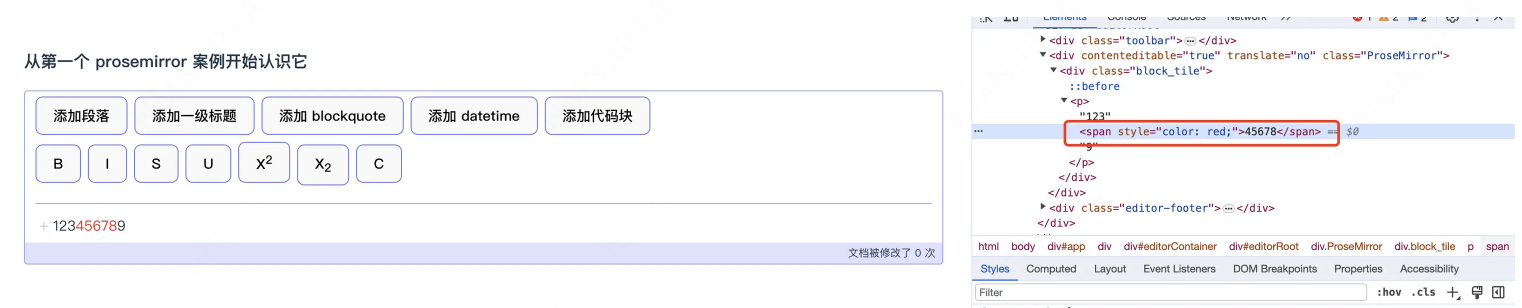
1 | // 创建一个默认文本 |
最终它的效果就是在 5 -> 10 的位置,将内容变为红色
实现代码块插件
Steps
Steps的定义
Position Mapping
Document transforms
核心概念:原始 doc → 应用多个 Step → 新 doc